Best Resolution for Website Images – Definitive Guide


If you’re a website owner, chances are you’ve struggled with keeping the quality of your website images consistent, at one point or another. Imagine spending hours creating beautiful graphics for your blog, only for them to show up blurry and pixelated on your site.
Fixing low-resolution images on your website can be frustrating, but it doesn’t have to be. This guide will explore everything you need about website image resolution, including how to change the image resolution and find the ideal pixel measurement for your site.
Let’s get started!
What is Image Resolution?
Image resolution is defined by the density of pixels, or dots, within a given area of an image. The density is measured in either dots per inch (DPI) or pixels per inch (PPI), indicating how many pixels are packed into every inch of the image. The amount of pixels directly influences its quality and how good the image looks overall.
The principle behind image resolution is simple: a higher DPI value means a greater number of pixels per inch, resulting in smaller, less noticeable dots that contribute to a sharper, more detailed image.
What Resolution is Best for Website Images?
Finding the best image resolution for your website can be complex if you don’t know where to start. Once you find the right plugins and measurements for your needs, it becomes just another admin task.
Optimizing images for web viewing involves finding a balance between file size, compatibility with various displays, and maintaining high visual consistency. To achieve this balance, we suggest starting with a high DPI or PPI image and adjusting according to your requirements.
When it comes to changing image resolution, there are two major types of image formats. Most of us are acquainted with digital image formats like JPG, and PNG, also known as raster graphics or bitmaps. We also need to learn about EPS or SVG files before moving forward.
Web Images
The most commonly suggested resolution for web images is 72 PPI, as it’s well-supported by most monitors and avoids lowering image quality. Exceeding this resolution not only potentially pixelates the image but can also negatively impact SEO due to heavier file sizes leading to longer load times and higher bounce rates.
Research shows that an additional second of loading time triples user bounce rate, causing it to soar up to 90%.
You can manage file sizes while preserving image quality by using image management tools like ThumbPress for WordPress sites. ThumbPress lets you edit images, and convert larger PNG and JPG formats to WebP for better compression.
What is a WebP File?
Google recently introduced a new image format named WebP, which combines characteristics of both JPG and PNG formats to support both lossy and lossless compression methods.
With this new format, comes better scope for developers to improve website loading speed. Google explains the methods for compression like this –
- Lossy Compression: Lossy WebP compression uses predictive coding. It predicts the pixel values within a block based on the values of surrounding pixel blocks to encode only the differences.
- Lossless Compression: WebP uses a method that recreates new pixels using fragments of the image that have previously appeared. It also might use a local palette when it fails to find a suitable match.
Vector Images
With high-resolution screens gaining popularity in recent years, images with 72 PPI might also appear fuzzy or pixelated. This is where resolution-independent vector files can change the game.
EPS or SVG files are visual file types that don’t use pixels but are instead based on mathematical equations. Vector images aren’t restricted by size or resolution and can be scaled up or down infinitely without losing quality, making them ideal for logos, symbols, icons, and other design elements that need resizing often.
Since .svg files are considered more convenient compared to their .jpg counterpart, you may be wondering why anyone would prefer bitmap over vector. The reason is that in many aspects, vector graphics can’t match the rich detail of bitmap images.
Images with pixels like bitmap cannot portray realistic textures because their color shading and depth variation are more limited.
How to Compress Your Images
Image compression lets you compress an image, and reduce its file size. This can be done using a handful of simple techniques, but the most popular method is a process called “quantization” – which combines similar colored pixels to form a single pixel, effectively reducing the image resolution and file size by 60-70%.
While it may sound complicated, you don’t have to know complex image-processing jargon to compress a simple image. Comprehensive plugins like ThumbPress can streamline the process for you.
Here’s a step-by-step on how to compress your images directly from your dashboard –
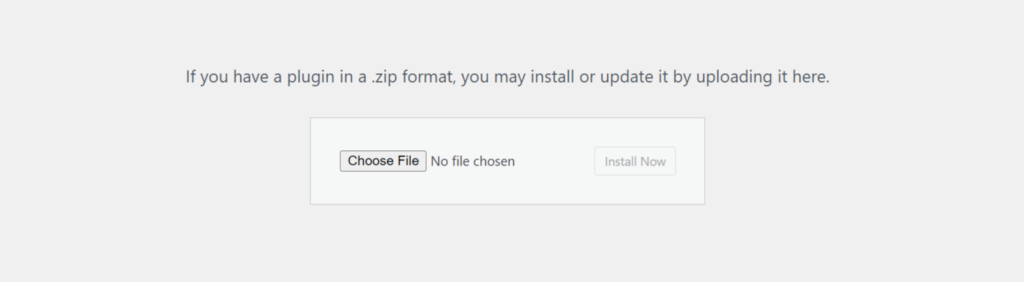
Step 1: Install and Activate ThumbPress Pro
First, Get a ThumbPress Pro subscription here. Then, Go to your Dashboard > Plugins > Add New Plugin and click the Upload Plugin button to add the pro plugin file to your dashboard.
Step 2: Enable Compress Images From Settings
To begin, navigate to: WordPress Dashboard → ThumbPress → Compress Images. Then, set Chunk Size & Compression.
Now, hit the Compress Now button. Compressing images might take some time and you cannot close that tab until it’s complete. To avoid this inconvenience you can enable Compress in Background.
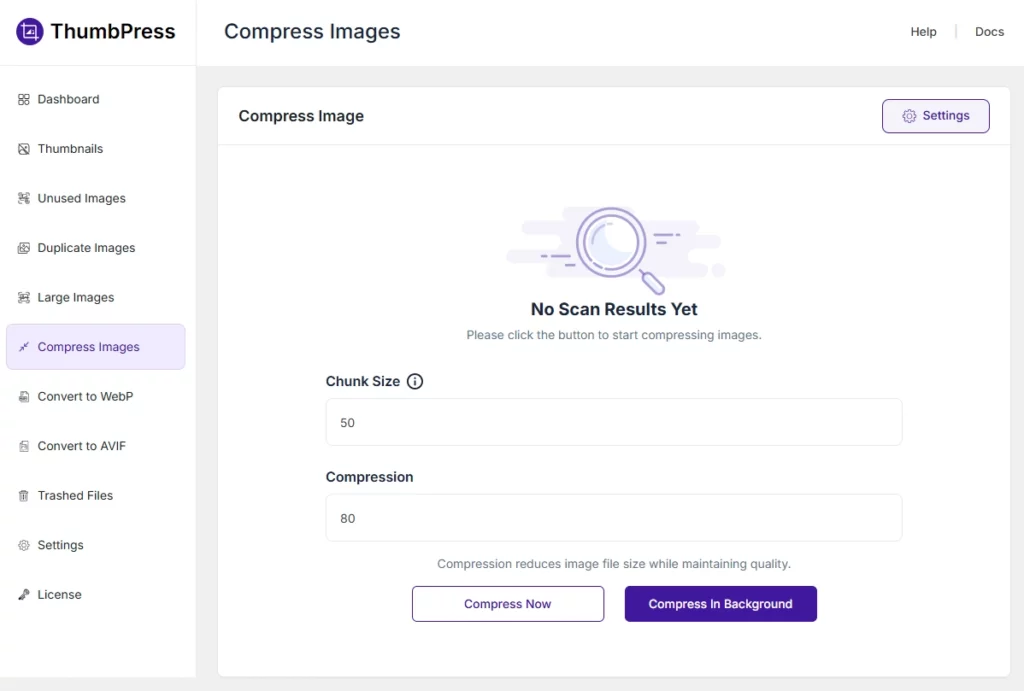
Note: ‘Compress Images’ is a Pro feature and you must have ThumbPress Pro to enable this feature from the settings page.
Step 3: Compress All Images at Once
You will also see a confirmation message like:
“Image Compression Complete – All images have been compressed successfully.”
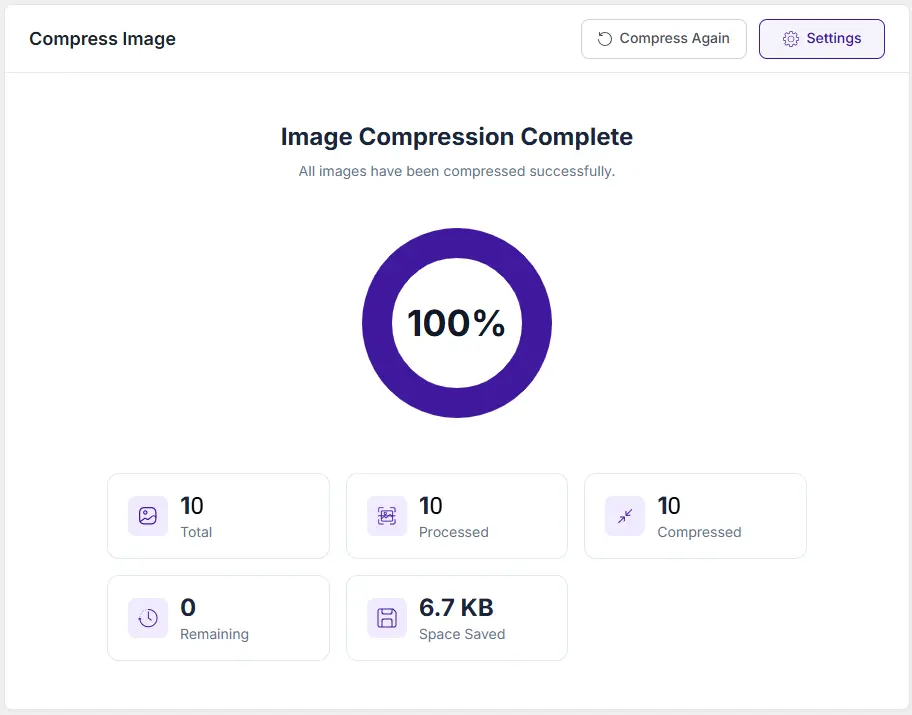
To optimize newly uploaded images or re-run compression, please click the Compress Again button at the top right.
Why Does Image Resolution Doesn’t Affect File Size?
A lot of people think that reducing the resolution of an image to 72 PPI makes it easier to post online or send it via email. While it is true that smaller files do upload/download faster lowering the resolution doesn’t make the file smaller.
This misconception stems from a misunderstanding of what determines an image’s file size. The file size is directly related to the image’s pixel dimensions, meaning the total number of pixels across its width and height. Changing the print resolution doesn’t affect the pixel count, thus it doesn’t impact the file size.
Wrapping Up
If you’re looking for the best resolutions for website images, start by finding an image with the highest PPI or DPI and adjusting it to your website requirements.
As a general rule of thumb, it’s best to not reduce your image resolution under 72 PPI to avoid blurry and pixelated images, and keep image size under 100KB, according to Google’s requirements.
If you’re struggling with changing image resolution or resizing your image, use plugins like ThumbPress to streamline image management for your website. WordPress add-ons like these are rich with features to help you structure your images to make your website stand out.
Subscribe to Our Newsletter
Get the latest WordPress tutorials, trends, and resources right in your inbox. No Spamming, Unsubscribe Anytime.

Thank you for subscribing to our newsletter!


Table of Content
- What is Image Resolution?
- What Resolution is Best for Website Images?
- Web Images
- What is a WebP File?
- Vector Images
- How to Compress Your Images
- Step 1: Install and Activate ThumbPress Pro
- Step 2: Enable Compress Images From Settings
- Step 3: Compress All Images at Once
- Why Does Image Resolution Doesn't Affect File Size?
- Wrapping Up