Best Ways to Convert All WebP Images in WordPress


Stunning images make your WordPress site look interactive, but they cause more harm than good. If your pages are loading at a slow pace, your beautiful images could be the culprit. This doesn’t just test your visitor’s patience, it can actually hurt your search engine rankings.
WebP images offer a solution, promising the same visual quality while loading much faster. But if you are like other website owners, the thought of converting your entire image library can make you feel nervous.
After all who has time to convert hundreds of images one by one? And with so many plugins and tools out there how do you know which one to trust?
In this guide, we’ll walk you through the best ways to convert all your images to WebP. Let’s go through the possible solution ahead!
Why You Should Use WebP Images in WordPress
Let me explain why WebP images are a game changer for WordPress websites.
Right now, most websites use image formats like JPEG and PNG. The problem? They’re bulky and take longer to load, making your website slower. And when a site is slow, visitors leave before they even see what you have to offer.
This is where WebP comes in.
WebP is a modern image format designed to keep your visuals crisp and clear while significantly reducing file sizes. That means your website loads faster, performs better, and gives visitors a smooth browsing experience.
Not only does WebP improve speed, but it also helps with SEO. Google favors fast-loading sites, which means using WebP can give your WordPress site a ranking boost. Plus, WebP supports transparency (like PNGs) and animations (like GIFs), making it a versatile choice for any type of image.
3 Effective Methods to Convert Images to WebP
Now we will explore the methods to convert your WordPress images to WebP. Here are three effective methods we are going to discuss in this section:
1. Using WebP Converter Plugin.
2. Using Hook.
3. Manual Method.
1. WebP Image Conversion Using WordPress Plugin
First, we will start with the plugin method. This one is an easy and time-consuming method. Let’s start with the steps:
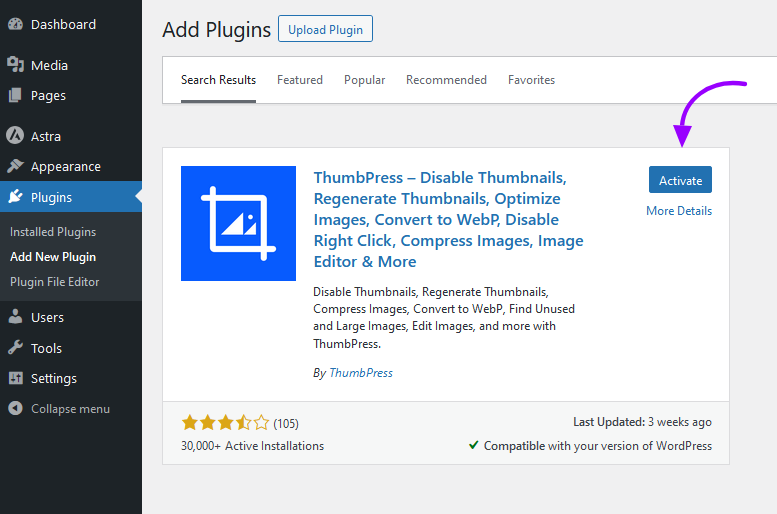
Step 1: Install ThumbPress
At the beginning, you have to go to your WordPress site Plugins >> Add New and install the ThumbPress plugin.
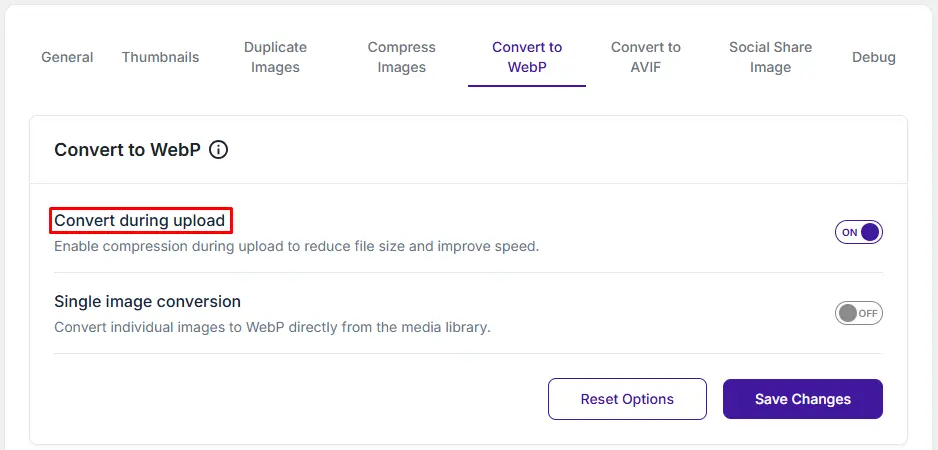
Step 2: Convert Images into WebP on Upload
To automatically convert images to WebP during upload:
WordPress Dashboard > ThumbPress > Settings > Convert to WebP
To convert images into WebP while they are being uploaded, you need to enable Convert During Upload button and click Save Changes.

Step 3: Configure the settings
After you enable this feature, you will discover a tab Convert to WebP. You will find 2 options: Convert image on upload, Single Image Conversion, including Bulk Image Conversion.
Enable these buttons according to your preference and click on the Save Settings button.
Step 4: Apply the feature to your website
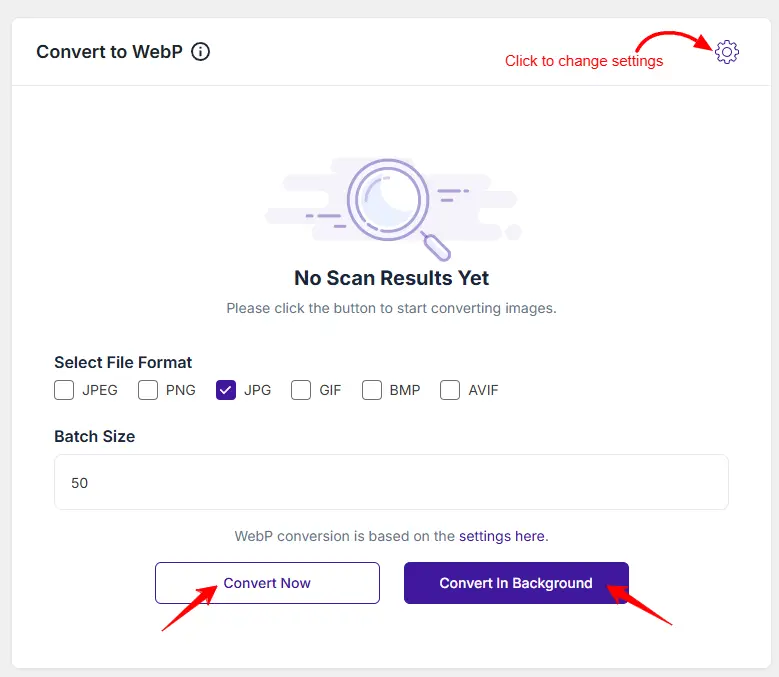
Your setup is now complete. For bulk WebP conversion, head to the WordPress Dashboard > ThumbPress > Convert to WebP. There you will find options to provide the number of images you want to process per request. Then, select file format & Set Batch Size.
After that click on the Convert Now or Convert in Background button to start the process.
If you don’t want to convert images while uploading you can go for the second option. For this, navigate to your WordPress Media and choose the image you want to convert. You can convert single images per request.
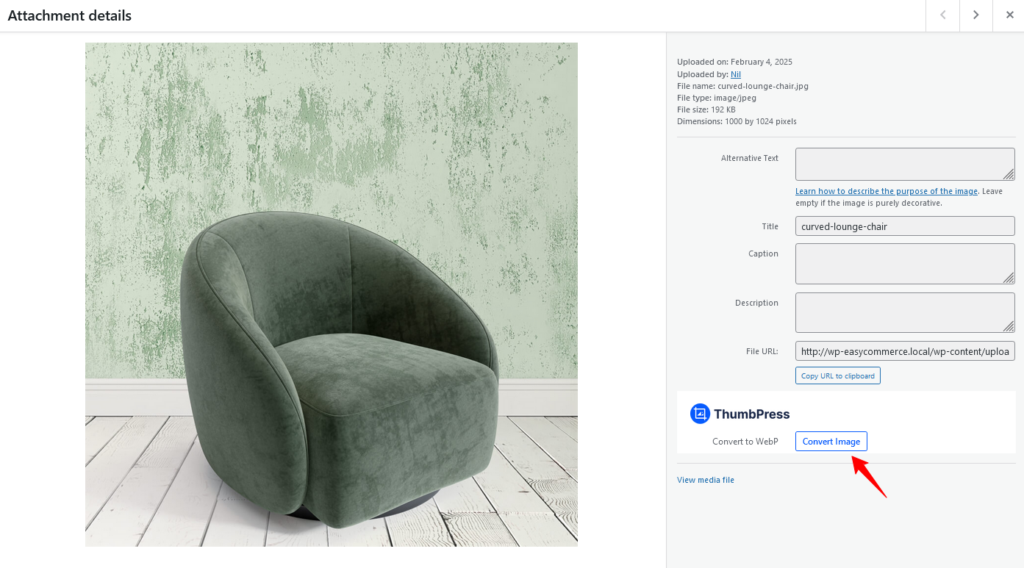
And if you wish to convert images while uploading make sure Convert Image on upload is enabled.
This is what the WebP conversion process looks like on the feature page.
2. Using Hook for WebP Image Conversion
If you are a developer and looking for a coding solution, then you should go with this part. Here are the steps you need to follow:
Step 1: Use wp_handle_hook
The wp_handle hook allows you to process images when they are uploaded. For this feature, you are required to add some code to your theme’s functions.php file. You can also create a custom plugin and upload it to your site.
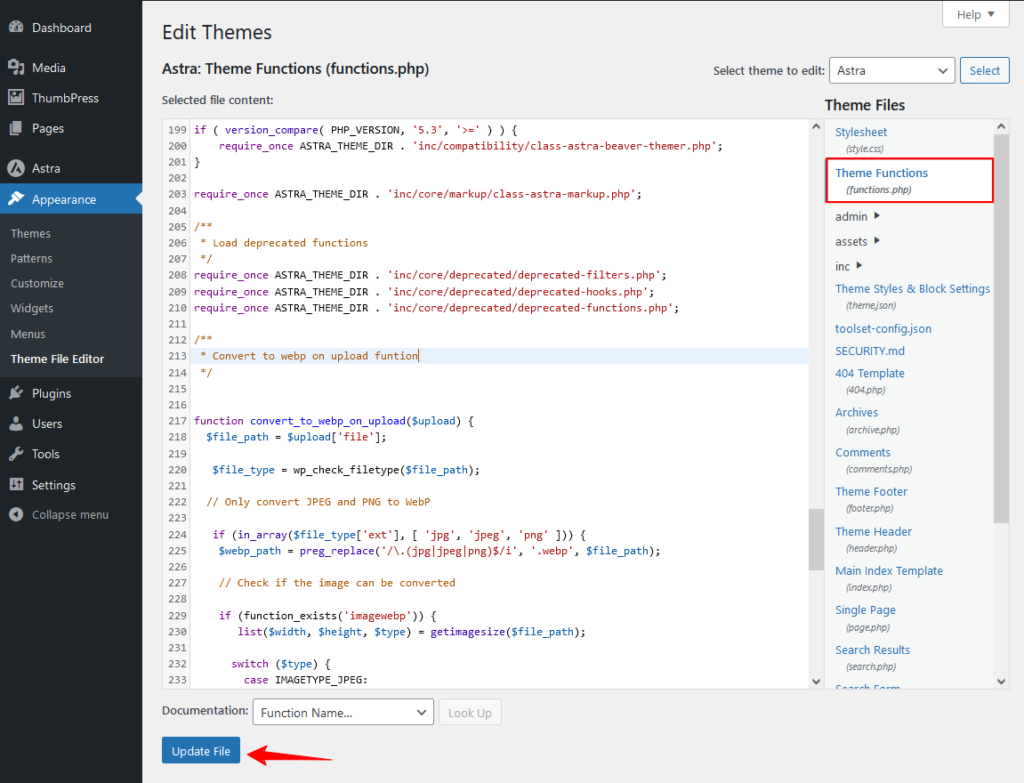
Step 2: Code implementation
Next, go to Themes >> Theme file editor and add the following code to your theme’s functions.php file. After the click on the Update button.
function convert_to_webp_on_upload($upload) {
  $file_path = $upload['file'];

   $file_type = wp_check_filetype($file_path);

  // Only convert JPEG and PNG to WebP

   if (in_array($file_type['ext'], [ 'jpg', 'jpeg', 'png' ])) {
    $webp_path = preg_replace('/\.(jpg|jpeg|png)$/i', '.webp', $file_path);

    // Check if the image can be converted

    if (function_exists('imagewebp')) {
       list($width, $height, $type) = getimagesize($file_path);

      switch ($type) {
        case IMAGETYPE_JPEG:

          $image = imagecreatefromjpeg($file_path);

          break;

        case IMAGETYPE_PNG:

          $image = imagecreatefrompng($file_path);

           imagepalettetotruecolor($image);

           imagealphablending($image, true);

           imagesavealpha($image, true);

           break;

        default:

          return $upload;  // Return original if not supported


      }

      // Convert and save as WebP

       if ($image) {
         imagewebp($image, $webp_path, 80);  // 80 is the quality percentage

        imagedestroy($image);

           // Remove the original file to save space (Optional)

 unlink($file_path);

            // Update file metadata

 $upload['file'] = $webp_path;

        $upload['url'] =
            preg_replace('/\.(jpg|jpeg|png)$/i', '.webp', $upload['url']);

         $upload['type'] = 'image/webp';


      }
    }
  }

  return $upload;
}

add_filter('wp_handle_upload', 'convert_to_webp_on_upload');
Step 3: Ensure your server supports WebP
If you find your code is not working, then check if your server has GD or Imageick enabled for WebP format. You can try this PHP snippet to verify:
var_dump(function_exists('imagewebp'));In the next step, we will explore the final method of how you can convert images to WebP manually.
3. Convert WordPress Images to WebP with Free Online Tools
You can manually convert your website images to WebP using some popular online tools. Each of these tools offers a simple drag-and-drop interface, making it easy to convert your images without any technical knowledge. Here I have listed some of them:
1. Ezgif
2. TinyIMG
3. CloudConvert
What Difference Does it Make in Your WordPress Site?
Switching to WebP images might seem like a small change, but it has a massive impact on your website’s performance. Think of it like upgrading from a slow, outdated phone to a sleek, high-speed smartphone, everything just works better, faster, and more efficiently.
With WebP, your site loads quicker, ranks higher on search engines, and even saves you storage space. Here’s how:
Increased Page Load Speed
WebP images are up to 30-50% smaller than JPEG and PNG files, yet they maintain high visual quality. When your images are lighter, your pages load faster.
And in today’s fast-paced digital world, speed is everything—slow-loading websites lose visitors quickly.
Improved SEO Rankings
Google prioritizes fast websites in search rankings, meaning a speed boost from WebP can directly help your SEO.
A faster site keeps visitors engaged, reduces bounce rates, and signals to search engines that your content is user-friendly — all of which improve your chances of ranking higher.
Reduced Bandwidth Usage
Since WebP images are smaller, they consume less bandwidth when loading. This is especially useful if you’re running a site with high traffic or catering to users with slower internet connections.
Plus, lower bandwidth usage means fewer data costs—great for both you and your visitors.
Increased Storage Efficiency
If your WordPress site has a lot of media content, image storage can quickly become a problem. WebP helps by reducing file sizes, and freeing up more storage space on your server.
This is particularly beneficial if you’re using limited hosting resources or running an image-heavy website like a blog, eCommerce store, or portfolio.
Final Words
So here is the summary of switching to WebP images in WordPress.
WebP image is one of the simplest yet most effective ways to boost your site’s performance. Whether you choose a plugin, a custom code solution, or a manual conversion tool, the benefits are clear — faster load times, improved SEO rankings, reduced bandwidth usage, and more efficient storage.
If you’re looking for a quick and hassle-free solution, a WebP conversion plugin is your best bet. Developers who want more control can use hooks to automate the process, while those who prefer manual conversion can rely on online tools.
At the end of the day, no matter which method you choose, one thing is clear, WebP will make your WordPress site faster and more efficient. Start converting your images today and watch your website perform better than ever!
Frequently Asked Questions (FAQs)
Q. How do I automatically convert images to WebP in WordPress?
To automatically convert images to WebP in WordPress, follow these steps:
1. Install and Activate the ThumbPress plugin on your website.
2. Navigate to ThumbPress >> Modules, enable the Convert to WebP option, and save the settings.
3. A new tab will appear on your WordPress dashboard. Click on it and enable the Convert Image on Upload option.
4. From now on, whenever you upload images to your site, they will be automatically converted to WebP format.
Q. What is the best plugin for convert images to WebP in WordPress?
The best plugin for converting images to WebP in WordPress depends on your needs (e.g., automatic image conversion to WebP, performance). If you want a completely free and flexible option, ThumbPress is the best.
Q. How do I bulk convert images to WebP in WordPress?
You can easily bulk-convert images using the free feature of the ThumbPress plugin. Follow these steps:
Step 1: Search for the free version of ThumbPress in the WordPress repository and install it.
Step 2: After activation, go to ThumbPress >> Modules and enable Convert to WebP feature.
Step 3: Save the settings, and you will see a new tab on your WordPress dashboard.
Step 4: Click on that tab and you will find the bulk convert images to WebP option.
Step 5: Finally, enter the number of images you want to convert and click the Convert Now button.
Subscribe to Our Newsletter
Get the latest WordPress tutorials, trends, and resources right in your inbox. No Spamming, Unsubscribe Anytime.

Thank you for subscribing to our newsletter!


Table of Content
- Why You Should Use WebP Images in WordPress
- 3 Effective Methods to Convert Images to WebP
- 1. WebP Image Conversion Using WordPress Plugin
- Step 3: Configure the settings
- 2. Using Hook for WebP Image Conversion
- 3. Convert WordPress Images to WebP with Free Online Tools
- What Difference Does it Make in Your WordPress Site?
- Increased Page Load Speed
- Improved SEO Rankings
- Reduced Bandwidth Usage
- Increased Storage Efficiency
- Final Words
- Frequently Asked Questions (FAQs)
- Q. How do I automatically convert images to WebP in WordPress?
- Q. What is the best plugin for convert images to WebP in WordPress?
- Q. How do I bulk convert images to WebP in WordPress?