The Ultimate Guide to Edit Image Permalink in WordPress
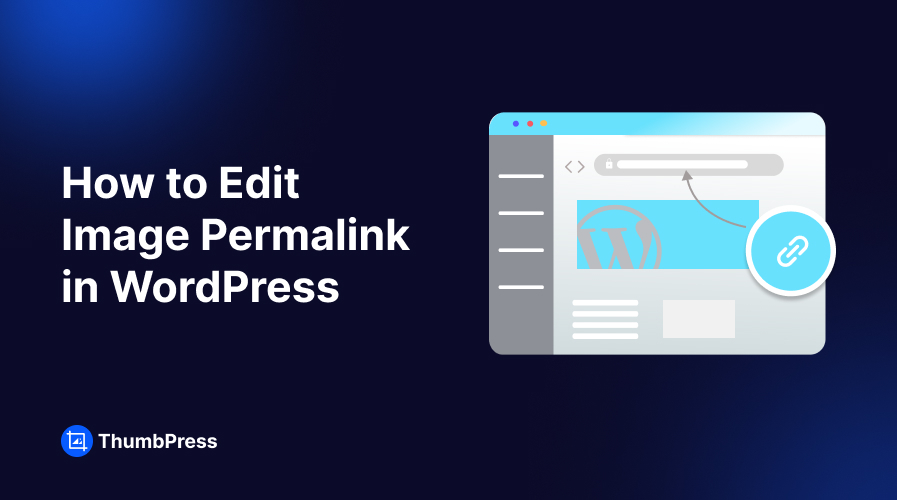
Ever created a new WordPress page and wondered where the link came from? That unique address is called a permalink, and it’s what allows visitors to find your specific content.
But what happens if you try to create a page with the same title? WordPress cleverly adds a number to avoid conflicts, like “example-2.png” for a duplicate image.
But as this can be messy, we’ve come up with a way for you to take control of this process. This guide will walk you through the steps of editing image permalinks in WordPress to ensure that your website stays organized and easy to navigate!
Importance of Editing Image Permalink in WordPress
Why mess with a good thing, right? Well, those automatically generated image URLs might seem harmless, but they can actually create headaches down the line.
Let’s explore the benefits of editing image permalinks in WordPress –
Boost SEO
Customizing image permalinks with relevant keywords helps search engines better understand your content. This boosts your site’s SEO and makes it easier for users to find your images through search engines.
Create a Professional Appearance
Creating custom permalinks gives your site a polished and professional look to help make it more appealing to visitors.
The default WordPress settings don’t automatically generate custom permalinks, so taking the time to create them yourself can set your site apart.
Improve Sharing Capabilities
Descriptive and clean permalinks are more attractive when a URL is shared on social media or other platforms.
An organized URL structure can lead to higher site impressions and clicks on search engines, ultimately driving more traffic to your site.
Simplify Management
Managing and organizing your images becomes much simpler with clear, well-structured permalinks, especially when dealing with a large media library.
This clarity improves your site’s navigation, makes it easier to locate and update specific images when needed, saving you time and effort in the long run.
How to Edit Image Permalink in WordPress
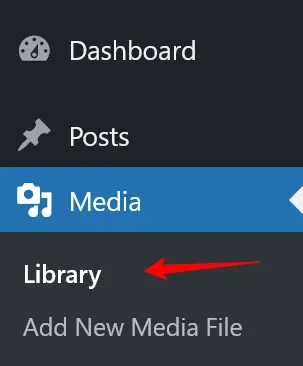
Step 1: Access Your Media Library
Go to your website Dashboard > Media > Library and select your desired image.
Step 2: Edit Selected Image to Change the Permalink
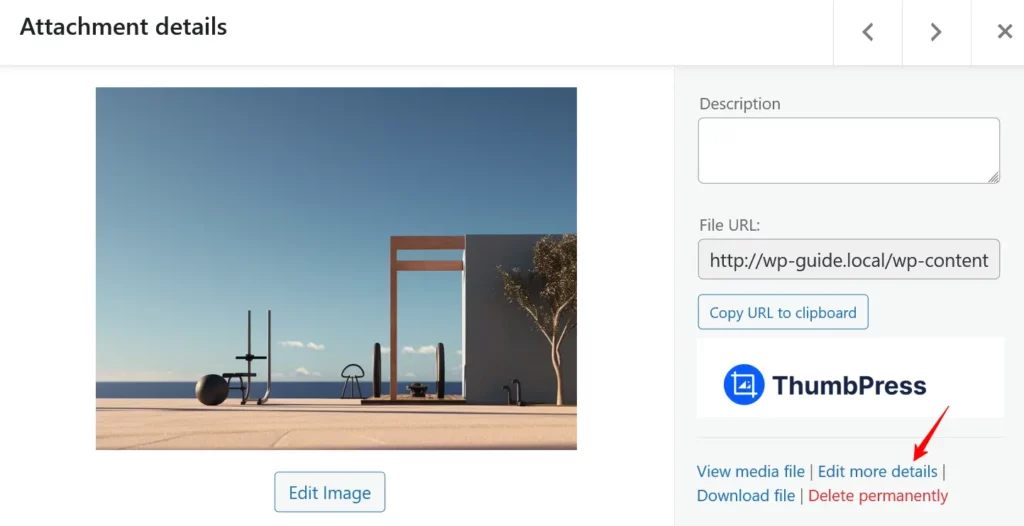
On the image page, scroll below and click on the Edit more details button.
Step 3: Set the Page Screen Element
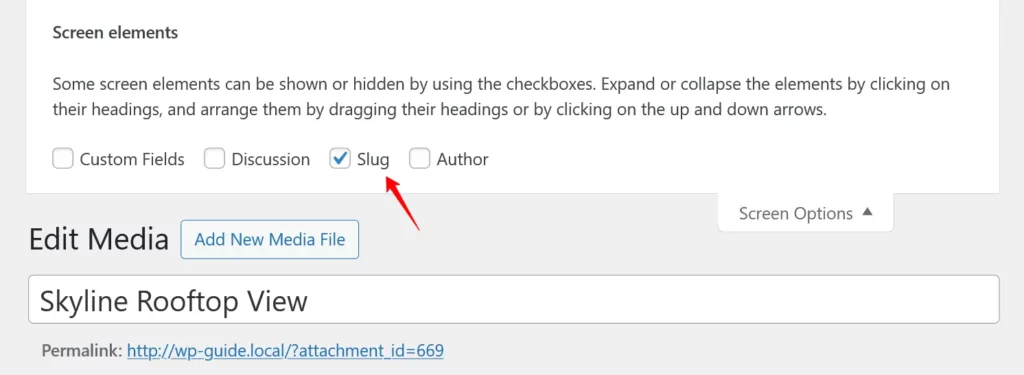
Now on that page, click the Screen Options from the top.

Enable the Slug element from the dropdown menu and click on the Update button.
Step 4: Change the Image Permalink
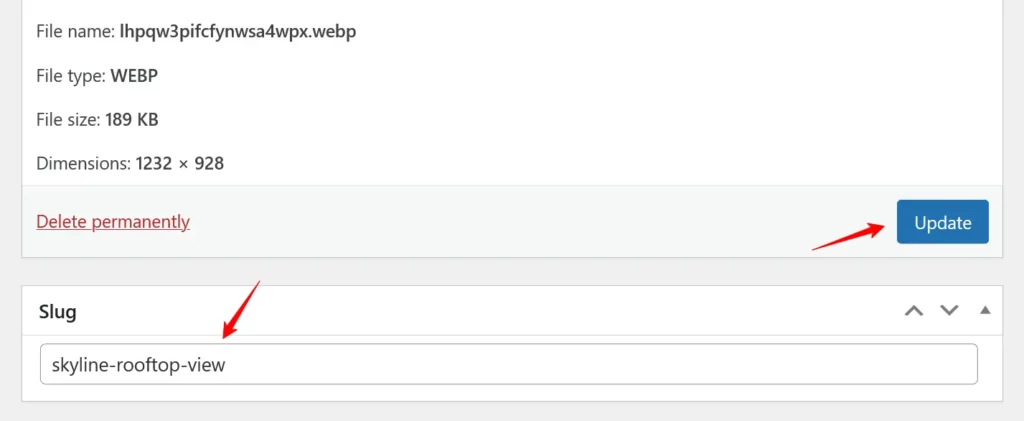
Enter your custom slug on the new slug field, below the description field. And click on the Update button to save the changes.
Step 5: Test the Changes
Check your image link on a different tab to check if it’s working properly.
Alternative Methods to Edit Image Permalinks in WordPress
If you’re unable to edit image permalink in WordPress as shown above, try the following alternative method –
Step 1: Remove the File
Start by deleting the image from your media library. Make sure to backup your website and images. Learn how to backup your website from here.
Step 2: Set Slug
Next, go to the destination folder on your computer where you want to use the permalink of the deleted image. Edit the file name to set the new permalink accordingly.
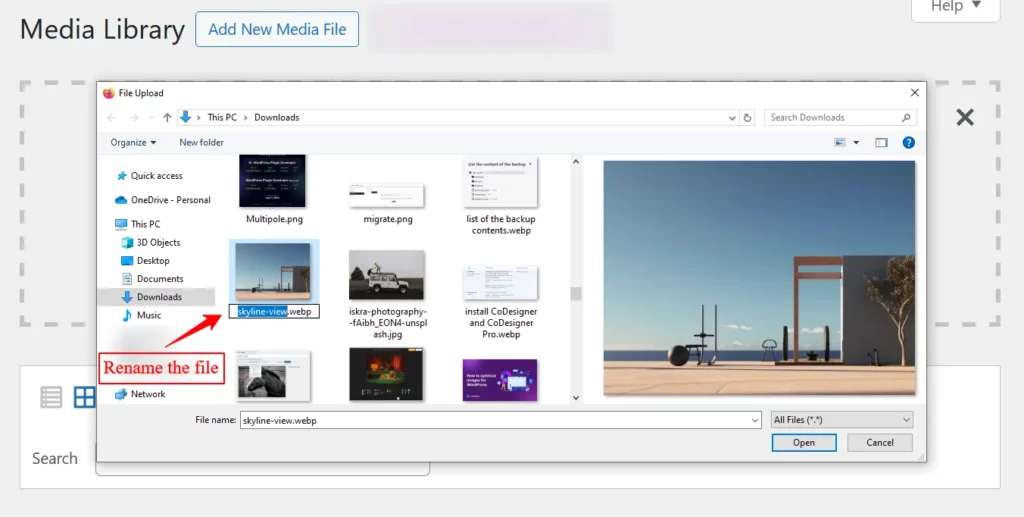
Step 3: Save and Reupload
Finally, reupload the image you have deleted and this time WordPress will automatically add the suffix to the image permalink instead.
Are Your Permalinks Not Working as Intended?
Sometimes permalinks won’t work the way you expected. Here are some steps you can take to help you troubleshoot this issue –
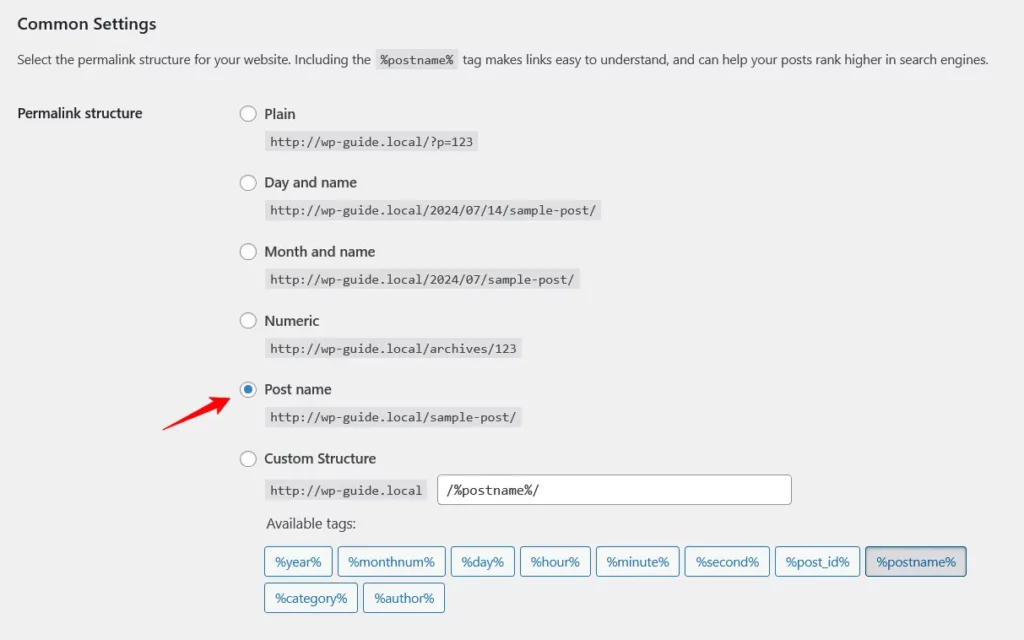
Step 1: Check Permalink Setup
Check the permalink setup to ensure the tags and syntax are correct. You can check all this setup by going to Settings > Permalinks.
Step 2: Remove Cache
If the link isn’t working, try it in an incognito tab. If it works there, clear your browser cache as well as your website cache.
Step 3: Redirect Links
When you change the permalink settings, there may be outdated links features in your website content. Edit those URLs or redirect them using a WordPress redirection plugin.
Learn about WordPress redirection from here.
Step 4: Rename Slug
Sometimes if you edit any slug manually it might not work. Check if any edit is needed.
Step 5: Plugin Compatability
Check if any plugins affect post types or links. You can deactivate them in a staging site to see if they are incompatible.
Step 6: Migrating Sites to New Server
When you migrate your WordPress site, some links might be missing. Check it with a broken link checker plugin.
Step 7: Restoring WordPress Backup
When you restore any backup of your site your permalinks can break. You can resolve this detection with a WordPress plugin.
Start Editing Image Permalinks Today!
Understanding permalinks in WordPress is major to getting a user-friendly and search-engine-optimized site. This guide has equipped you with the necessary knowledge and steps to edit and customize image permalinks to ensure your website is not only well-organized but also optimized for growth.
Still have questions? We’re here to help! Leave a comment below with any lingering issues, and we’ll do our best to get you back on track.
Frequently Asked Questions (FAQs)
What are permalinks in WordPress?
Permalinks is the permanent address, where a piece of content is available in a WordPress site.
How do I change image permalinks in WordPress?
To change image permalinks in WordPress:
- Go to your site Media > Library and Select any image.
- Click on the Edit More Details button.
- Set the page screen elements as Slug and Update it.
- After that customize the slug for your post.
- Finally, update the image to save your changes
Why do I create custom permalinks?
The primary reason for creating custom permalinks is to make your site address more user-friendly and SEO-friendly. Custom permalinks make it easier for users to understand your website’s structure and improve search engine results.
How do I create 301 redirects in WordPress?
- Install and activate the All-in-One SEO plugin on your WordPress site.
- Go to All in one SEO > Redirects from your WordPress dashboard.
- Next click the Settings tab and Select PHP as the Redirect Method.
- After that, enter the you’d like to redirect in the source URL.
- Finally, make sure the Redirect path.
Subscribe to Our Newsletter
Get the latest WordPress tutorials, trends, and resources right in your inbox. No Spamming, Unsubscribe Anytime.

Thank you for subscribing to our newsletter!

Table of Content
- Importance of Editing Image Permalink in WordPress
- Boost SEO
- Create a Professional Appearance
- Improve Sharing Capabilities
- Simplify Management
- How to Edit Image Permalink in WordPress
- Step 1: Access Your Media Library
- Step 2: Edit Selected Image to Change the Permalink
- Step 3: Set the Page Screen Element
- Step 4: Change the Image Permalink
- Step 5: Test the Changes
- Alternative Methods to Edit Image Permalinks in WordPress
- Step 1: Remove the File
- Step 2: Set Slug
- Step 3: Save and Reupload
- Are Your Permalinks Not Working as Intended?
- Step 1: Check Permalink Setup
- Step 2: Remove Cache
- Step 3: Redirect Links
- Step 4: Rename Slug
- Step 5: Plugin Compatability
- Step 6: Migrating Sites to New Server
- Step 7: Restoring WordPress Backup
- Start Editing Image Permalinks Today!
- Frequently Asked Questions (FAQs)
- What are permalinks in WordPress?
- How do I change image permalinks in WordPress?
- Why do I create custom permalinks?
- How do I create 301 redirects in WordPress?


