
How to Increase the Maximum File Upload Size in WordPress


Frustrated by WordPress refusing to upload your large files?
If you are trying to add high-quality media or bulky plugin files and keep getting blocked, you are likely running into the default file upload size limit. This setting is common and catches many users off guard, especially when building more media-rich pages.
Instead of scaling down your content or finding workarounds, there are smarter solutions.
In this guide, we’ll show you how to increase maximum file upload size in WordPress safely and effectively so you can keep your site running as you want it to.
Let’s check out the details!
Why Increase WordPress Maximum Upload Size in WordPress
Sometimes, WordPress won’t let you upload files like high-quality images, videos, themes, or plugins. That’s because it has a default limit on how big each file can be. If your file is too large, you will get an error, and the upload won’t go through.
Increasing the maximum upload size in WordPress helps you avoid those roadblocks, letting you work more smoothly, and you can build your site without restrictions.
Here are a few real-life moments when the file upload limit can get in your way:
- Using a lot of media files.
- Uploading high-quality files.
- Installing a large theme or plugin.
- Updating content frequently beyond your current limit.
- Selling digital products like eBooks, photos, videos, and more
How to Check the Maximum Upload File Size in WordPress?
WordPress automatically shows the maximum file upload size when you are uploading something to your website.
To check this, simply
- Go to your WordPress dashboard.
- After that, click on Media > Add New.
- Look below the upload box. You will see a message that says something like: Maximum upload size: 2MB or the current limit.
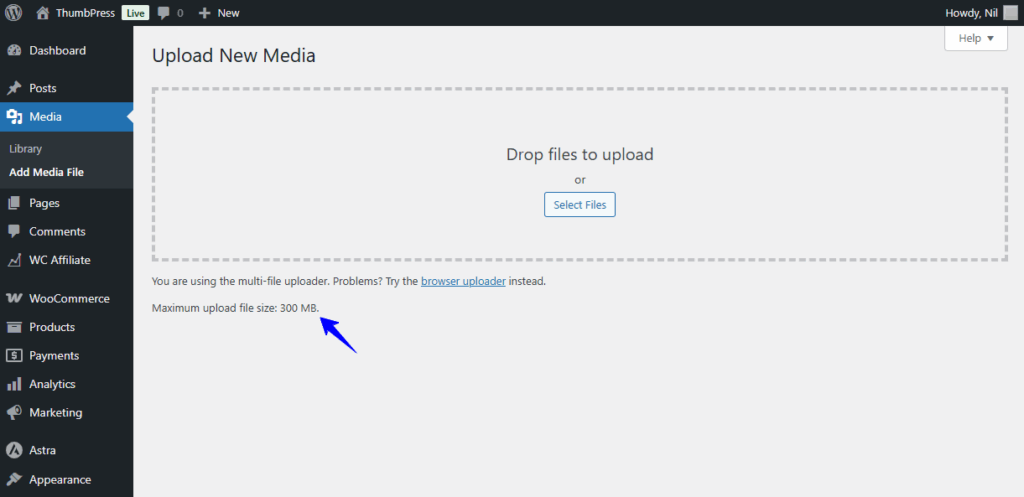
That’s your current upload limit. If you try to upload a file larger than that size, WordPress will block it.
How to Increase Maximum File Upload Size in WordPress
There are many ways to increase maximum file upload size in WordPress. In this section, you will get the best methods to change the upload limit in WordPress.
1. Using WordPress Plugin
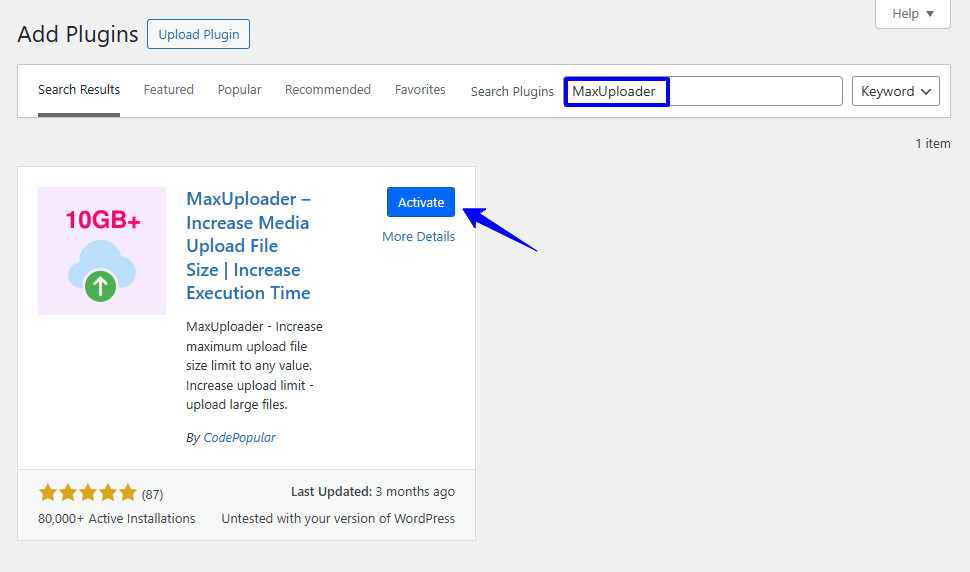
Not everyone feels comfortable writing code or using SSH or FTP to access website files. If that sounds like you, using a plugin is a much easier option. In this case, we will use the MaxUploader WordPress plugin to increase maximum file upload size in WordPress.
Step 1: Install and Activate the Plugin
Go to your WordPress Dashboard > Plugins > Add New, then search for MaxUploader. Click Install and then Activate the plugin.
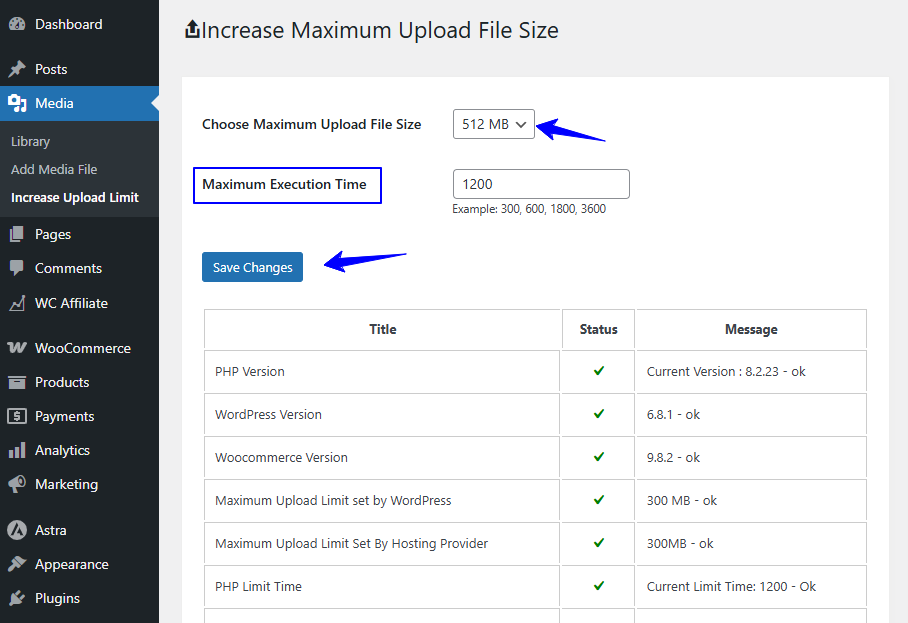
Step 2: Configure Settings
Once it’s installed, go to the plugin’s settings and type in the upload size you want, for example, 128MB or 512MB. After that, click the Save Changes button to apply the new upload limit.
2. Edit functions.php File
When trying to upload high-quality images, videos, or other large files to your WordPress site, you will get an error saying the file is too big. This often happens when your upload size limit is set too low.
WordPress officially tells its users to use NGINX/Apache for best performance. Sometimes the .htaccess can be hidden, but there are other ways to fix it.
Step 1: Add Code to Your Theme’s function.php
You can increase maximum file upload size in WordPress manually. For this, go to Appearance > Theme File Editor > function.php. After that, add the following code to the bottom and click on the Update file button.
@ini_set( 'upload_max_size' , '64M' );
@ini_set( 'post_max_size', '64M');
@ini_set( 'max_execution_time', '300' );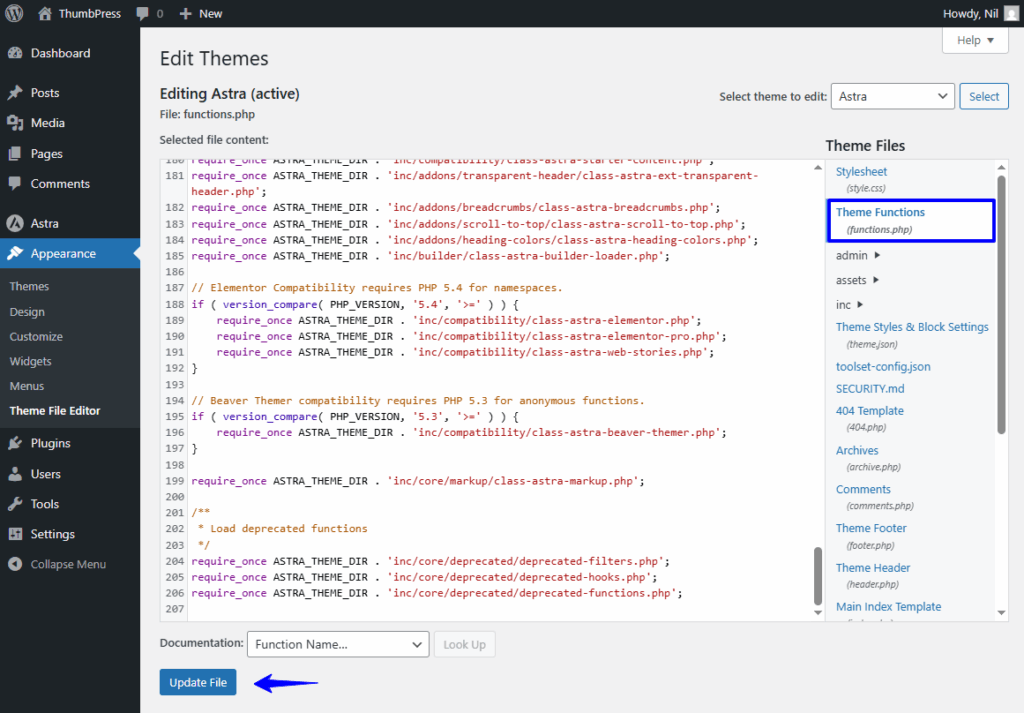
Heads-up: This change only applies to the current theme. If you change themes, you’ll need to re-add the code to the new one.
Step 2: Use a WordPress Plugin
If you are comfortable with using a plugin, you can try any WordPress plugins for adding this code snippet.
Here is what you need to do –
Install and activate the Code Snippets plugin, and then navigate to the Add New Snippet screen. Use the same code here and save it.
3. Increase Maximum Upload File Size via FTP/cPanel
If your site uses Apache and PHP is set as an Apache module, you can increase the upload limit by editing your WordPress .htaccess file.
Be careful: A small mistake in this file can break your site. Make sure to back it up before making any changes. If you’re not sure, ask your hosting provider for help.
Step 1: Edit .htaccess via FTP
Connect to your server using an FTP client like FileZilla.
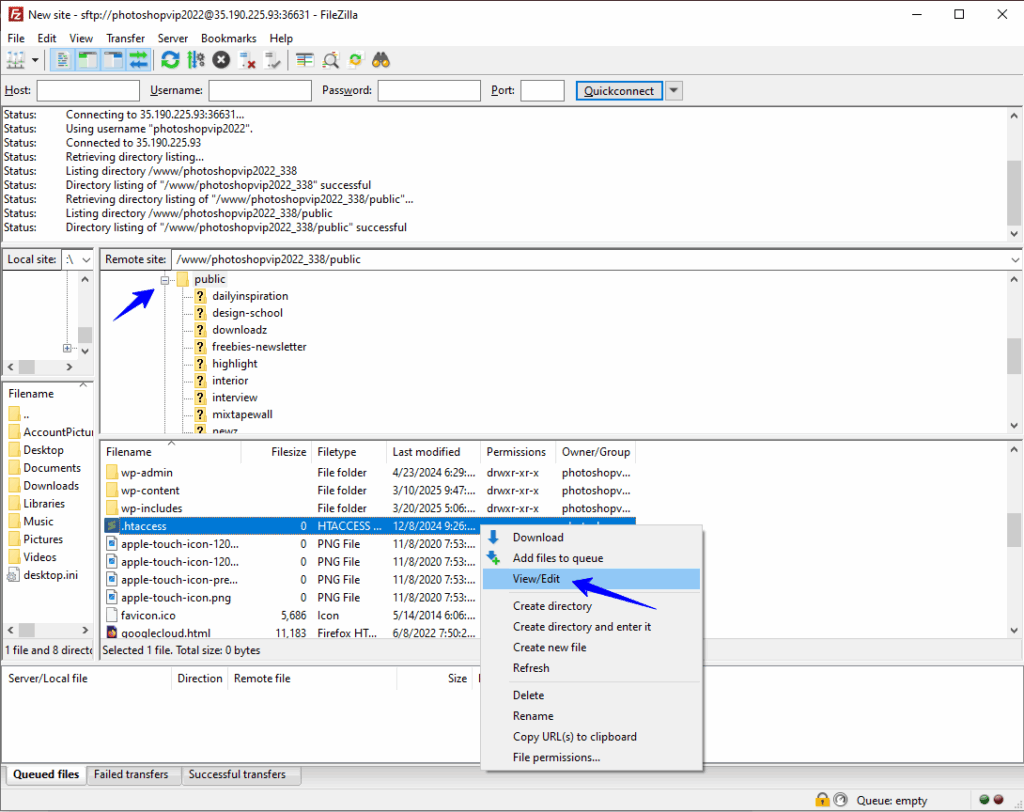
Go to your WordPress folder. Open the file and add this code at the top or before # BEGIN WordPress.
php_value upload_max_filesize 64M

php_value post_max_size 128M

php_value memory_limit 256M

php_value max_execution_time 300

php_value max_input_time 300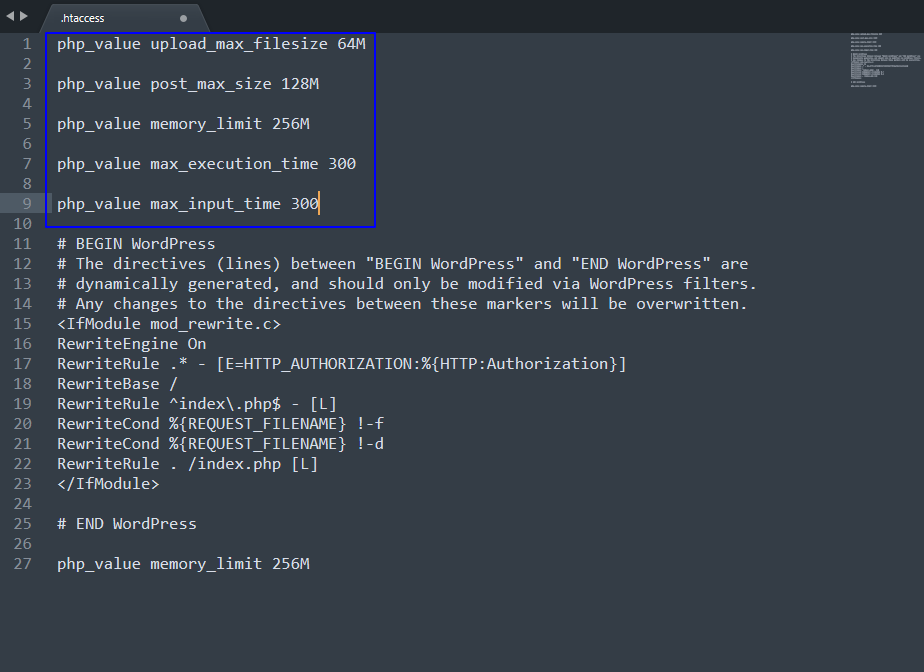
Step 2: Use cPanel
Log in to cPanel and open File Manager. After that, go to the public_html folder.
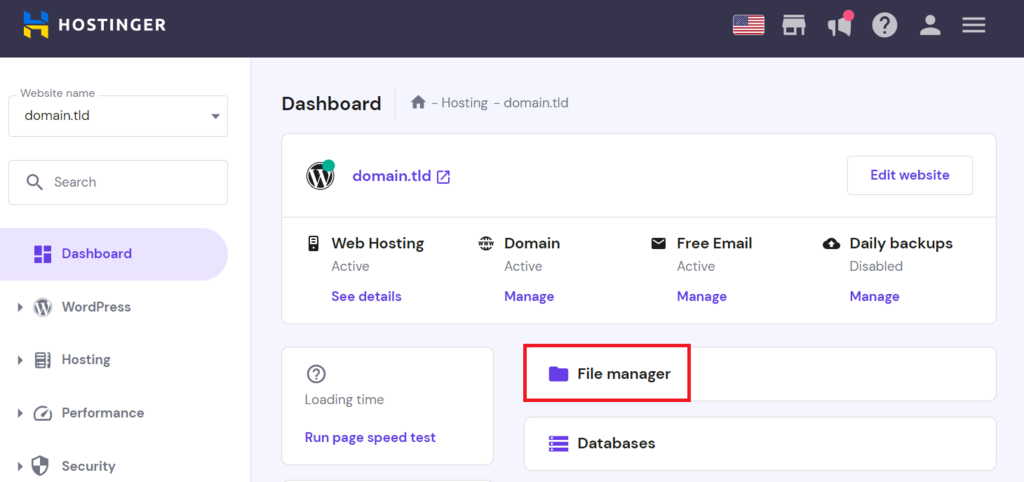
Right-click .htaccess to Edit and paste the same code before # BEGIN WordPress.
If you want to skip FTP or cPanel process, you can simply install a plugin like Htaccess File Editor in your website to edit the .htaccess file directly from your WordPress dashboard, no FTP or cPanel needed.
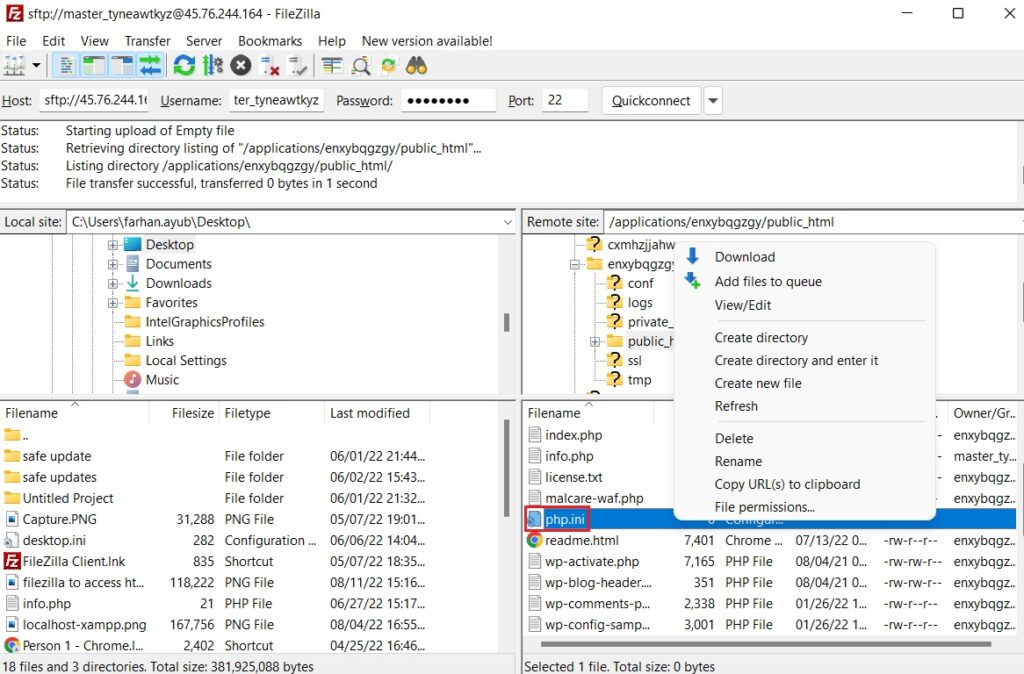
4. Create or Edit php.ini File
The php.ini file is a basic settings file used by websites that run on PHP (WordPress). It controls things like how big a file you can upload, how long a script can run, and how much memory your site can use.
Step 1: How to Edit This File
Go to your WordPress root folder. You can do this using FTP (like FileZilla) or SSH. Look for a file named php.ini. If it’s already there, you can open and edit it. If you don’t see it, don’t worry, you can create a new one.
Step 2: How to Create a New php.ini File
Open your text editor, like Notepad, on your computer. After that, paste the following code.
upload_max_filesize = 64M

post_max_size = 128M

memory_limit = 264M
Next, save the file as php.ini. Make sure the file extension is .ini, not .txt. After that, use FTP or SSH to upload this file to your WordPress root folder ( where wp-config.php is located)
5. Increase Upload Size in Multisite
If you’re using WordPress Multisite, you can change the upload file size limit for all the sites on your network. Here’s how you can increase maximum file upload size in WordPress multisite:
- Go to your Network Admin dashboard and navigate to Settings > Network Settings.
- Next, scroll down to the Upload Settings section and look for the Max upload file size field
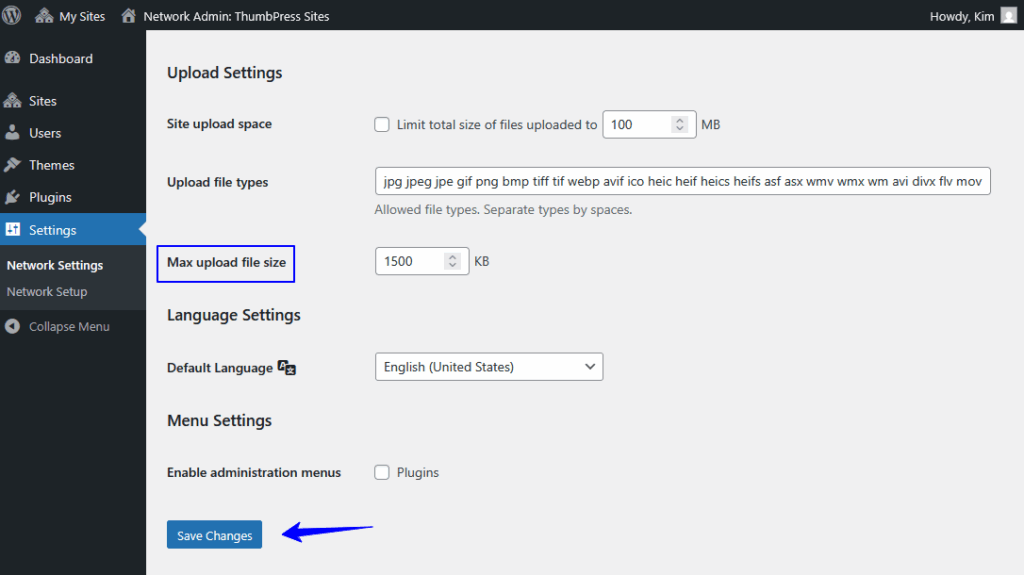
By default, this is set to 1500 KB (about 1.5 MB). You can enter a higher value, for example, 131072 KB (which equals 128 MB), and click Save Changes.
Important: This setting won’t override your server’s upload limit. If you set a higher value than what your server allows, it won’t work. Make sure your server is configured to support the new limit. You can use other methods (like editing php.ini or .htaccess) to update the server settings.
You can also control the total upload size allowed for each site in your network, but that option is turned off by default.
How to Prevent Large File Uploads Using WordPress’ upload_size_limit Filter?
Large files, like videos and big images, can slow down your website. To avoid that, you can limit the file size for non-admin users using a small piece of code or use a WordPress plugin to set maximum image upload size.
Here’s the code you’ll need:
function custom_upload_size_limit( $size ) {

    if ( ! current_user_can( 'manage_options' ) ) {

        $size = 1024 * 5120; // 5 MB

    }

    return $size;

}

add_filter( 'upload_size_limit', 'custom_upload_size_limit', 20 );
What this code does:
It checks if the user is an admin. If the user is not an admin, the upload limit is set to 5 MB. Admins can still upload larger files without any limit.
Where to add this code:
- Go to your WordPress dashboard.
- Click on Appearance > Theme Editor.
- On the right side, find and click on the functions.php file.
- Scroll to the bottom and paste the code (just before the ?> tag, if there is one).
- Click Update File to save.
Wrapping Up
There are several easy ways to increase your file upload limit. You can edit code files like .htaccess, php.ini, or functions.php, use a plugin, or adjust settings in your hosting control panel.
Once you increase the limit, you can upload high-quality media, install larger plugins or themes, and manage your content without worrying about file size. Just make sure your server’s settings support the changes.
Now you can upload large files easily and keep growing your site. If you’re unsure, you can always ask your hosting provider or use the mentioned plugin for a simpler solution.
Frequently Asked Questions (FAQs)
Q. How to increase upload_max_filesize?
You can increase upload_max_filesize by editing your site’s php.ini file (if your hosting provider allows it). Find the line that says:
upload_max_filesize = 2MChange it to a higher value, like:
upload_max_filesize = 64MAfter saving the file, restart your server if needed. If you don’t have access to php.ini, you can try adding the same rule in .htaccess or wp-config.php, or ask your hosting provider for help.
Q. How do I increase my WP memory limit?
To increase your WordPress memory limit, open the wp-config.php file in your site’s root folder and add this line:
define( 'WP_MEMORY_LIMIT', '256M' );This increases the memory WordPress can use. Make sure your hosting plan allows it; otherwise, you may need to ask your host to increase it from their end.
Q. How can I increase the maximum upload size through the hosting provider?
Most hosting providers let you adjust upload limits from your control panel. Here’s how:
cPanel: Go to your hosting File manager and Select PHP Version >> Options or MultiPHP INI Editor, then raise the values for upload_max_filesize, post_max_size, and memory_limit.
Managed Hosting: Some hosts, like Hostinger, Kinsta, WP Engine, require you to contact support. They’ll usually raise the limits for you quickly. If you’re not sure, check your host’s documentation or reach out to their support team.
Q. How do I increase maximum image upload size in WordPress using a plugin?
To increase maximum image upload size in WordPress, follow the easy steps below:
- Go to your WordPress dashboard >> Plugins >> Add New.
- Search for ThumbPress, install it, and activate the plugin.
- Then, open ThumbPress Settings, turn on the Image Upload Limit option, and Save Changes.
- Next, on the new tab, set the image size limits you want, and save your settings.
Q. How to disable unnecessary thumbnails in WordPress?
To disable unnecessary thumbnails in WordPress, you have to-
- Go to Dashboard > Plugins > Add New, search for ThumbPress, and activate it.
- Open ThumbPress Settings, enable Disable Thumbnails, and save the settings.
- In the new tab, drag the image sizes you want to turn off to the right.
- Save your changes again.
Subscribe to Our Newsletter
Get the latest WordPress tutorials, trends, and resources right in your inbox. No Spamming, Unsubscribe Anytime.

Thank you for subscribing to our newsletter!


Table of Content
- Why Increase WordPress Maximum Upload Size in WordPress
- How to Check the Maximum Upload File Size in WordPress?
- How to Increase Maximum File Upload Size in WordPress
- 1. Using WordPress Plugin
- 2. Edit functions.php File
- 3. Increase Maximum Upload File Size via FTP/cPanel
- 4. Create or Edit php.ini File
- 5. Increase Upload Size in Multisite
- How to Prevent Large File Uploads Using WordPress’ upload_size_limit Filter?
- Wrapping Up
- Frequently Asked Questions (FAQs)
- Q. How to increase upload_max_filesize?
- Q. How do I increase my WP memory limit?
- Q. How can I increase the maximum upload size through the hosting provider?
- Q. How do I increase maximum image upload size in WordPress using a plugin?
- Q. How to disable unnecessary thumbnails in WordPress?