How to Optimize Images For WordPress – A Complete Guide

Images are a great asset to your website, but many people upload them without proper optimization. Unoptimized images bloat your server space and significantly slow down your website.
But fret not, this can easily be fixed by routinely optimizing your images – directly from your dashboard.
This blog will show you the easiest way to optimize images for WordPress and cover all the best practices for improving user experience. Stick with us to the end, and you will be all set to optimize images for WordPress.
5 Reasons to Optimize Images for WordPress
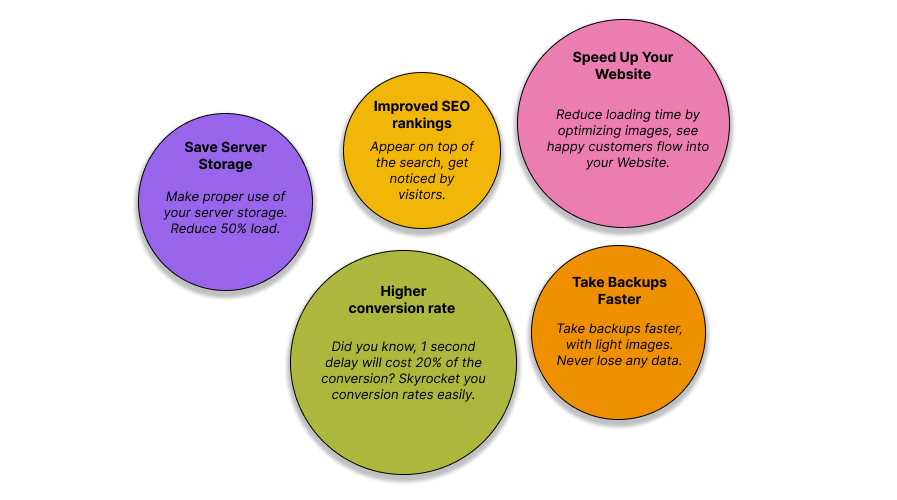
Speed Up Your Website
A slow-loading website can sway away visitors and drop your conversion rate. If you have high-quality images on your site, they may be the main culprit. Optimizing these images can speed up your website loading time and keep your visitors satisfied.
Top the Search Results
According to Google’s guide to search ranking systems, page load time is one of the main factors for ranking at the top of the searches. You can show your audience that you’re dedicated to their satisfaction with a well-managed, fast website.
Save Server Space
Website storage is not unlimited and unoptimized images can quickly occupy a ton of space. Studies show that images can take up to 50% of your total server storage. You can reduce file sizes and save precious space by simply optimizing your images.
Take Backups Faster
Backing up your data is essential to making regular updates and keeping your site running smoothly. Bulky images will not only slow down this process but also generate hefty backup files. Optimizing images comes to the rescue in that case.
Boost Conversion Rates
Backing up your data is essential to making regular updates and keeping your site running smoothly. Bulky images will not only slow down this process but also generate hefty backup files. Optimized images mean faster website, lower bounce rate and higher conversions.
Optimize Images Using WordPress Default Settings
Optimizing your images using WordPress default setting is both limiting and ineffective. Here are a few things you can do to better handle your images.
Edit Images from Media Library
After uploading an image to your media library, you can edit it from WordPress. Go to the Media Library, click on the image, then hit the ‘Edit Image’ button.
Here, you can crop, rotate, and scale images for your website.

Cropping and scaling images help reduce their file size and dimension to free up server space to store more important files.
Adding Alt Text
Whenever you upload an image to your media library, you can add an alternative text for the image, describing the image briefly. Use relevant keywords in your alt texts to make them appear higher on searches.
To add alt text to any of your images, open the image from the media library. At the top right, you will find a section named ‘Alternative Text’. Simply write down the text and you’re good to go!

How to Optimize Images for WordPress Quickly – Using a Plugin
If you’re frustrated with the default image optimization settings of WordPress, ThumbPress is your all-in-one solution. Here’s how you can optimize images using ThumbPress.
Step 1: Get ThumbPress
ThumbPress is a versatile image management tool, packed with features to optimize all your images. It’s a Freemium plugin, but you can access most of the image optimization features for free.
But to have the premium experience, we suggest you get ThumbPress Pro, which is surprisingly affordable.
First, install ThumbPress from your WordPress repository. Go to Plugin > Add New Plugin > Search ThumbPress > Install and activate.
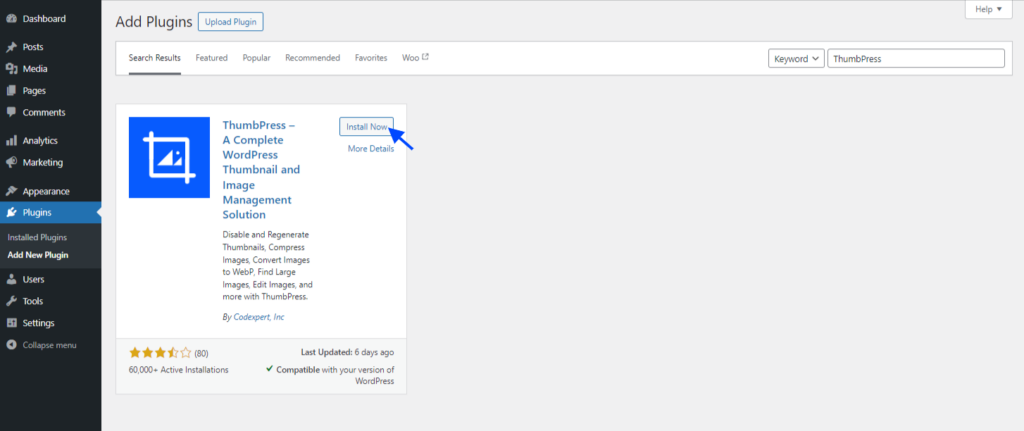
For the pro plugin, get the desired package, and activate the plugin on your dashboard. Plugin > Add New Plugin > Upload a Plugin > Install and activate.

Step 2: Enable ThumbPress Features
With ThumbPress and ThumbPress Pro, you can access all the features of ThumbPress and quickly optimize your images.
Enable all the features from the Modules section of the ThumbPress dashboard. Go to the modules section, enable all the features, and hit Save Settings.

Below, we will show you how to optimize your images with ThumbPress.
Step 3: Change the Image Format
Check your image format of your images, as not all formats are ideal for your website. WebP format is the most preferred image type by most browsers.
With ThumbPress, you can convert your JPGs and PNGs to WebP format with just one click. You can either convert all your existing images individually, in bulk or convert them during upload.
To convert images into WebP during upload, go to the modules section, enable the ‘Convert Image on Upload’ function, and then hit Save Settings.

Now, whenever you upload an image, it will automatically be converted into WebP.
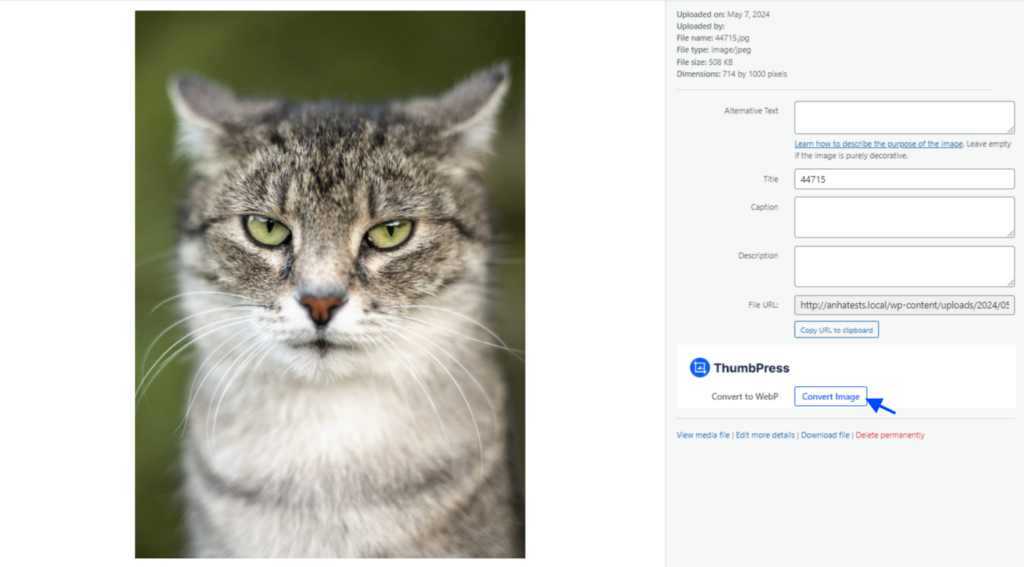
If you want to convert a single image in WebP, go to the modules section, enable ‘Single Image Conversion,’ and Save Settings.

After that, open the image you want to convert from the media library and click on the ‘Convert Image’ button at the bottom. Your image will be instantly converted to WebP.
To convert images in bulk, head over to the ‘Convert to WebP‘ feature page. Here, you will find the Convert All button. Click the button, and all the images from your media library will be converted to WebP.
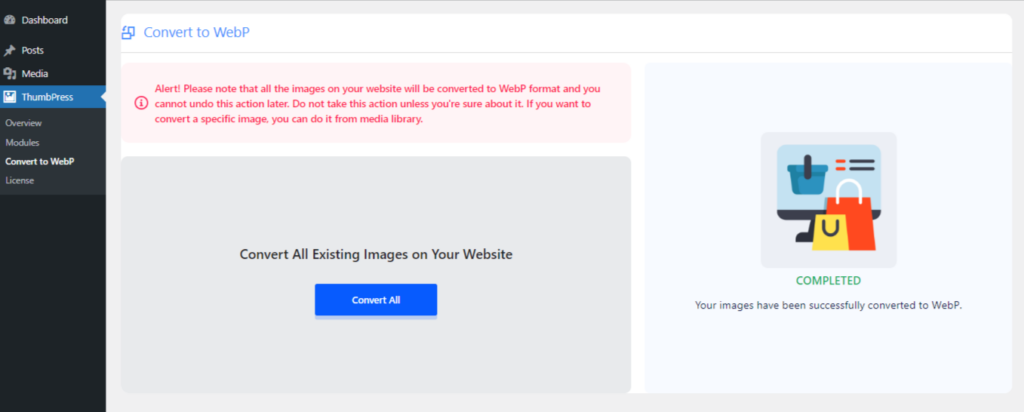
Note: Back up your original image file before converting it into WebP. After you finish converting into WebP, you cannot revert them.
Check out our detailed blog about converting images to WebP to learn more.
Step 4: Compress Images
Images can be compressed to different levels, which varies depending on the tool you are using.
With ThumbPress, you can compress all images at once or while uploading them. To compress all the images simultaneously, go to the ‘Compress Images’ section from the sidebar and hit the Compress All button.
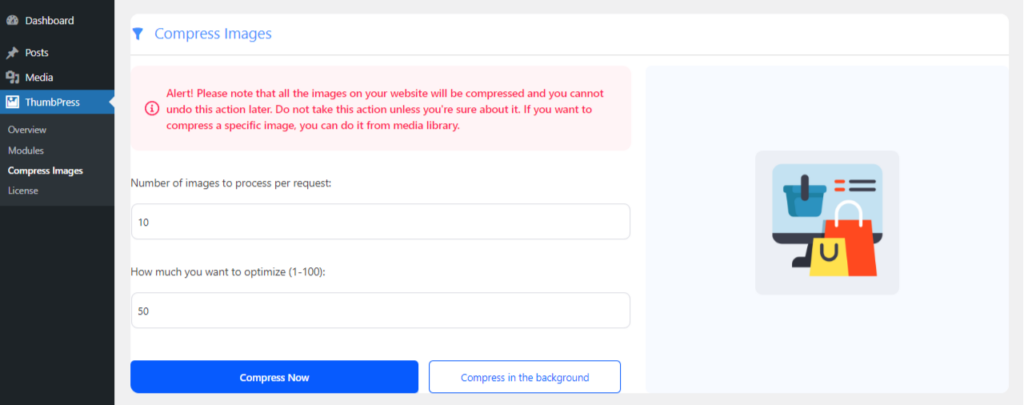
Note: Image compression might take some time, and you must keep the tab open until it’s complete. Or you can enable the Compress in the Background.
If you want images to be compressed automatically while they are being uploaded, go to Modules > Compress Images and enable Compress Automatically, set Default Compression Percentage, and hit Save Settings.

Read more on Image Compression on WordPress here.
Step 5: Detect and Delete Unused Images
Over time, your WordPress media library can accumulate forgotten images, silently gobbling up precious server space. ThumbPress can help you reclaim that space!
Detect and delete unused images with ThumbPress in an instant! To do that, go to the Detect Unused Images section from the sidebar and hit the Detect button.
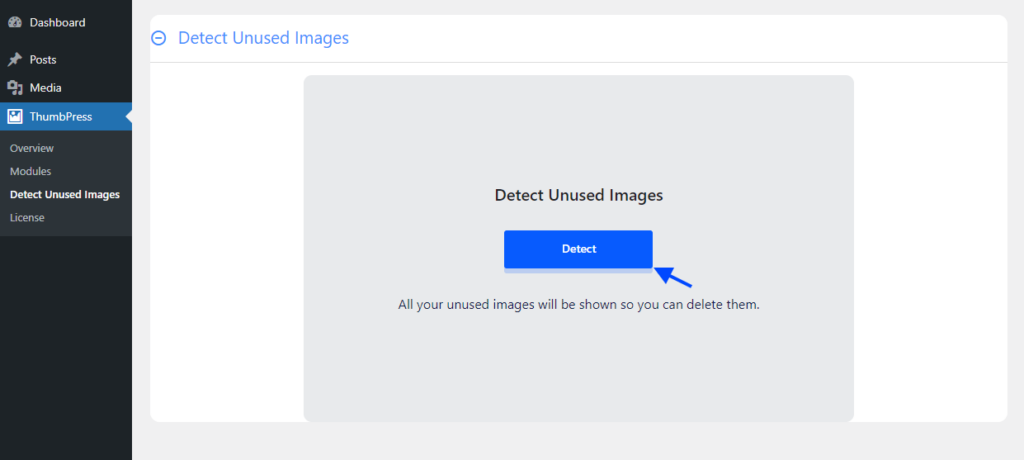
That’s it! ThumbPress will show you a list of unused images you have in your media library. Now, you can delete those unused images or use them for something else.
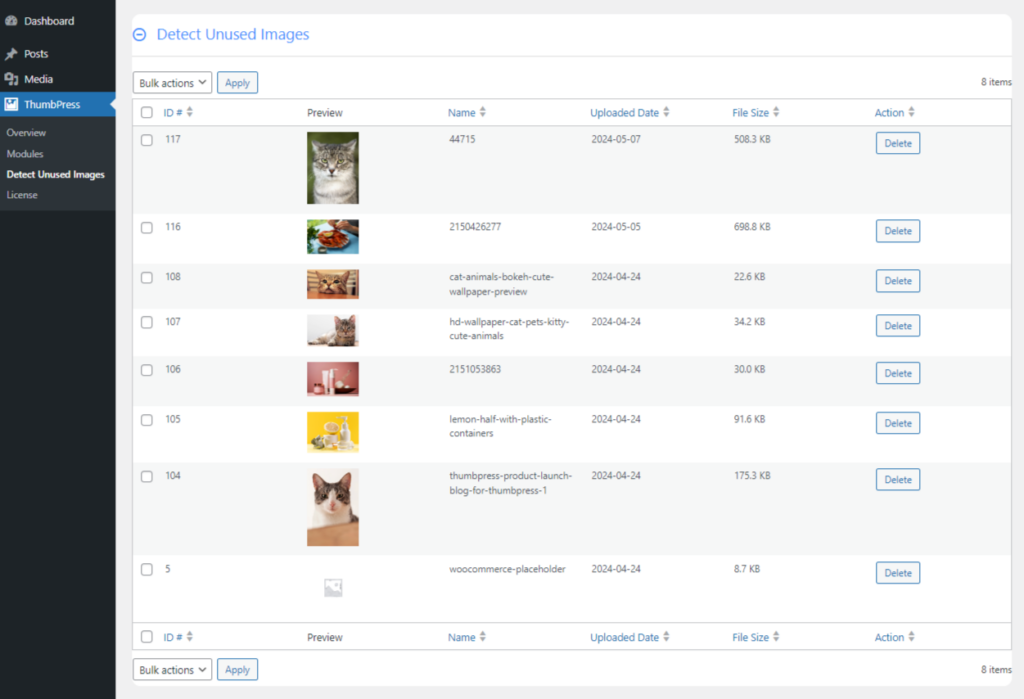
For more information on detecting unused images, you can check out our blog here.
Step 6: Detect and Compress/ Delete Large Images
Large, forgotten images in your media library can drag down your website’s speed, frustrating visitors with slow load times. Even if you’ve enabled compression for new uploads, these hidden giants can still cause problems.
To detect large images on your website, go to the Detect Large Images section and insert the minimum value to see images above that value. After that, hit the Detect button.
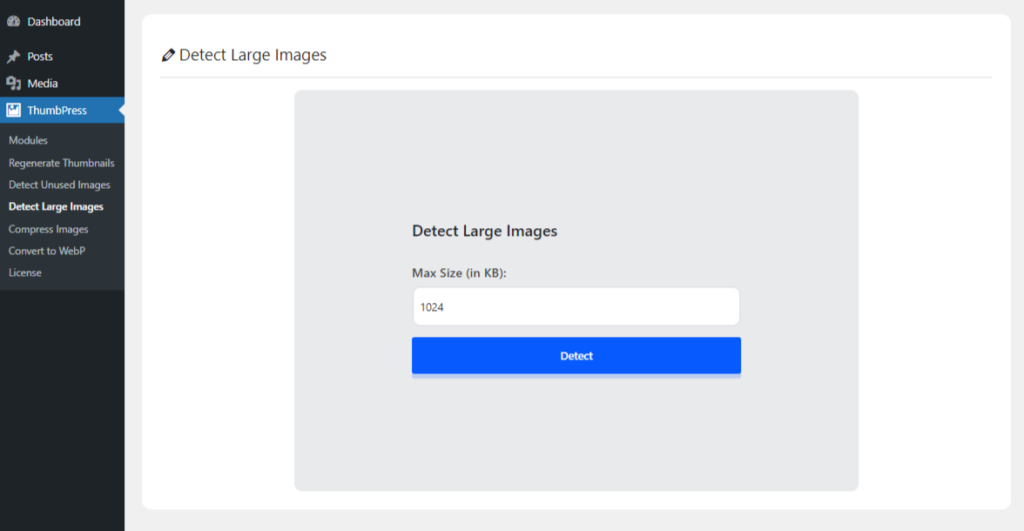
You will find a list of all the images larger than the value that you have set.
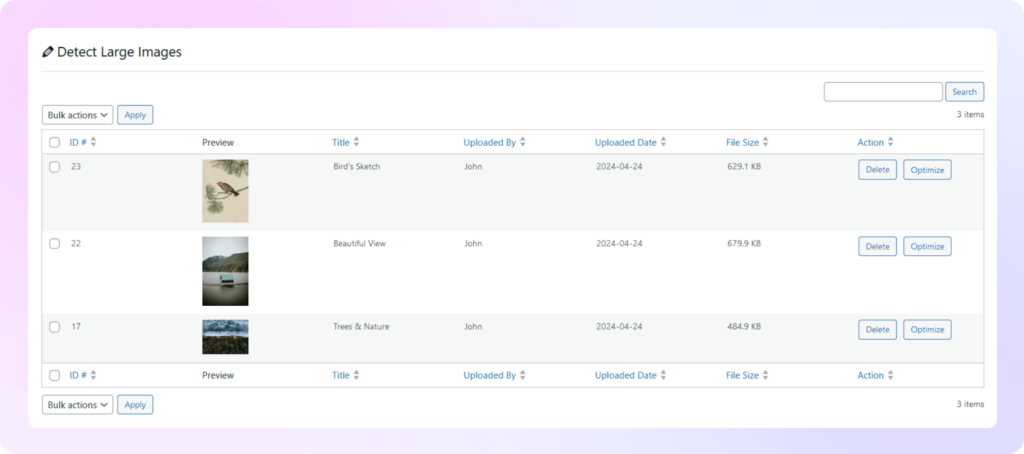
You can delete or compress these images from this page by clicking on the action buttons.
These were the necessary ThumbPress features to help you optimize your images. However, ThumbPress also has a few other features that can greatly improve your image quality, and website performance.
Here are some tips to help you effectively optimize your images –
- Edit your images and make them aesthetically pleasing to the visitors with the Image Editor feature.
- Set Maximum Image Upload Limit to have a consistent image size throughout your website.
- Replace images with new versions, stay relevant to trends, and keep content fresh all the time.
- With this amazing feature, you can set social media thumbnails to portray appropriate image sizes across all your social media platforms.
Expert Picks for Best Images Optimization Practices in WordPress
Use a Content Delivery Network (CDN)
Deliver your images through a content delivery network (CDN). Using a CDN for your WordPress website will ensure your visitors receive the data from a server closer to them. Some hosting providers offer CDN as a part of their service, or you can add it separately.
Enable Lazy Load
Generally, all the content on your website is loaded at once when someone visits it. A content-heavy website can take a lot of time to load, and you will lose a lot of visitors from this.
Enabling lazy load is a blessing for content-heavy websites, as it helps you retain more visitors. With lazy load, your website focuses on loading content first and image second. So, other elements are instantly visible on the website, engaging visitors.
Remove EXIF Data
EXIF data is the information about where and when the picture was taken. That data is automatically added to the image by the camera and it’s not necessarily important for the web files. Removing this data from your images can improve website speed to some extent. It is not huge but it still impacts your website if removed for a lot of images.
Enable Caching
Caching is another great practice for optimizing images and increasing website speed. It means saving some of your data in a place so visitors can access it faster. This data is often saved on a third-party server for better customer convenience.
Catching can be enabled through coding or by using a plugin.
Optimize Images and Improve Website Speed Now!
Image optimization is a huge part of improving website performance. It can enhance website speed, make you appear on top of the search engines, and retain visitors for much longer.
In this blog, we have explored various actions to help you with image optimization and make the process easier with a user-friendly plugin that includes everything. Know all the best practices and techniques and start improving your website today!
Frequently Asked Questions (FAQs)
How do I upload an image to WordPress without losing quality?
You need to choose the right image format for that. To retain the quality of your images, convert the image file using a compatible plugin, resize, and determine the image size before uploading them.
What Is the Best Image Size for WordPress?
WordPress has different sizes for different types of images. In general, for thumbnails, image sizes should be 150px x 150px, for logos 200px X 200px, for featured images 1200px X 900px, and for background images, the image sizes should be 1920px to 1080px. Learn more about the best image sizes for your WordPress website.
Does WordPress reduce image size?
If you have set a maximum image upload size using the ThumbPress or Optimize Images default option, your image sizes will automatically be reduced; otherwise, they will remain the same.
Subscribe to Our Newsletter
Get the latest WordPress tutorials, trends, and resources right in your inbox. No Spamming, Unsubscribe Anytime.

Thank you for subscribing to our newsletter!

Table of Content
- 5 Reasons to Optimize Images for WordPress
- Speed Up Your Website
- Top the Search Results
- Save Server Space
- Take Backups Faster
- Boost Conversion Rates
- Optimize Images Using WordPress Default Settings
- Edit Images from Media Library
- Adding Alt Text
- How to Optimize Images for WordPress Quickly - Using a Plugin
- Step 1: Get ThumbPress
- Step 2: Enable ThumbPress Features
- Step 3: Change the Image Format
- Step 4: Compress Images
- Step 5: Detect and Delete Unused Images
- Step 6: Detect and Compress/ Delete Large Images
- Expert Picks for Best Images Optimization Practices in WordPress
- Use a Content Delivery Network (CDN)
- Enable Lazy Load
- Remove EXIF Data
- Enable Caching
- Optimize Images and Improve Website Speed Now!
- Frequently Asked Questions (FAQs)


