WooCommerce Product Image Size: A Complete Guide


You uploaded your product photos. They looked great on your phone. Now they’re blurry on the shop page, or stretched on one product but squashed on another, or the entire shop page loads painfully slow.
Most of this comes down to one thing: WooCommerce product image size.
WooCommerce generates multiple versions of every image you upload. Each version serves a different part of your store. If you don’t understand what those sizes are, how to set them, and what to do after you change them, you’ll keep running into the same problems.
This guide covers all of it. Default sizes, recommended dimensions, step-by-step configuration, thumbnail regeneration, image optimization, and the most common image issues WooCommerce store owners run into. Let’s get into it.
How WooCommerce Handles Product Images
Three WooCommerce Image Size Slots
WooCommerce registers three image sizes for every store. Per the official WooCommerce developer documentation:
- woocommerce_thumbnail – defaults to 300px width, square cropped. Used in product grids: the shop page, category pages, related products, upsells, and cross-sells.
- woocommerce_single – defaults to 600px width, always uncropped. Used on single product pages for the main product image.
- woocommerce_gallery_thumbnail – always 100×100px, always square-cropped. Used for the small navigation thumbnails below the main image in the product gallery.
The WooCommerce developer docs also note that themes can declare their own image sizes, which means a theme can override these defaults entirely via add_theme_support(). When that happens, the width controls disappear from your Customizer. You can still adjust cropping, but the widths are locked in code.
Why WooCommerce Creates Multiple Image Versions?
Every time you upload a product image, WooCommerce runs a background job to generate all three sizes. If your theme and plugins have registered additional sizes on top of those three, the number goes higher still. On a busy WooCommerce store, a single product photo upload can silently create 10 or more separate image files in your media library, most of which are never shown to a single customer.
This is worth understanding because it explains two things: why your media library fills up faster than expected, and why changing your size settings does not automatically fix existing images.
Recommended WooCommerce Product Image Sizes
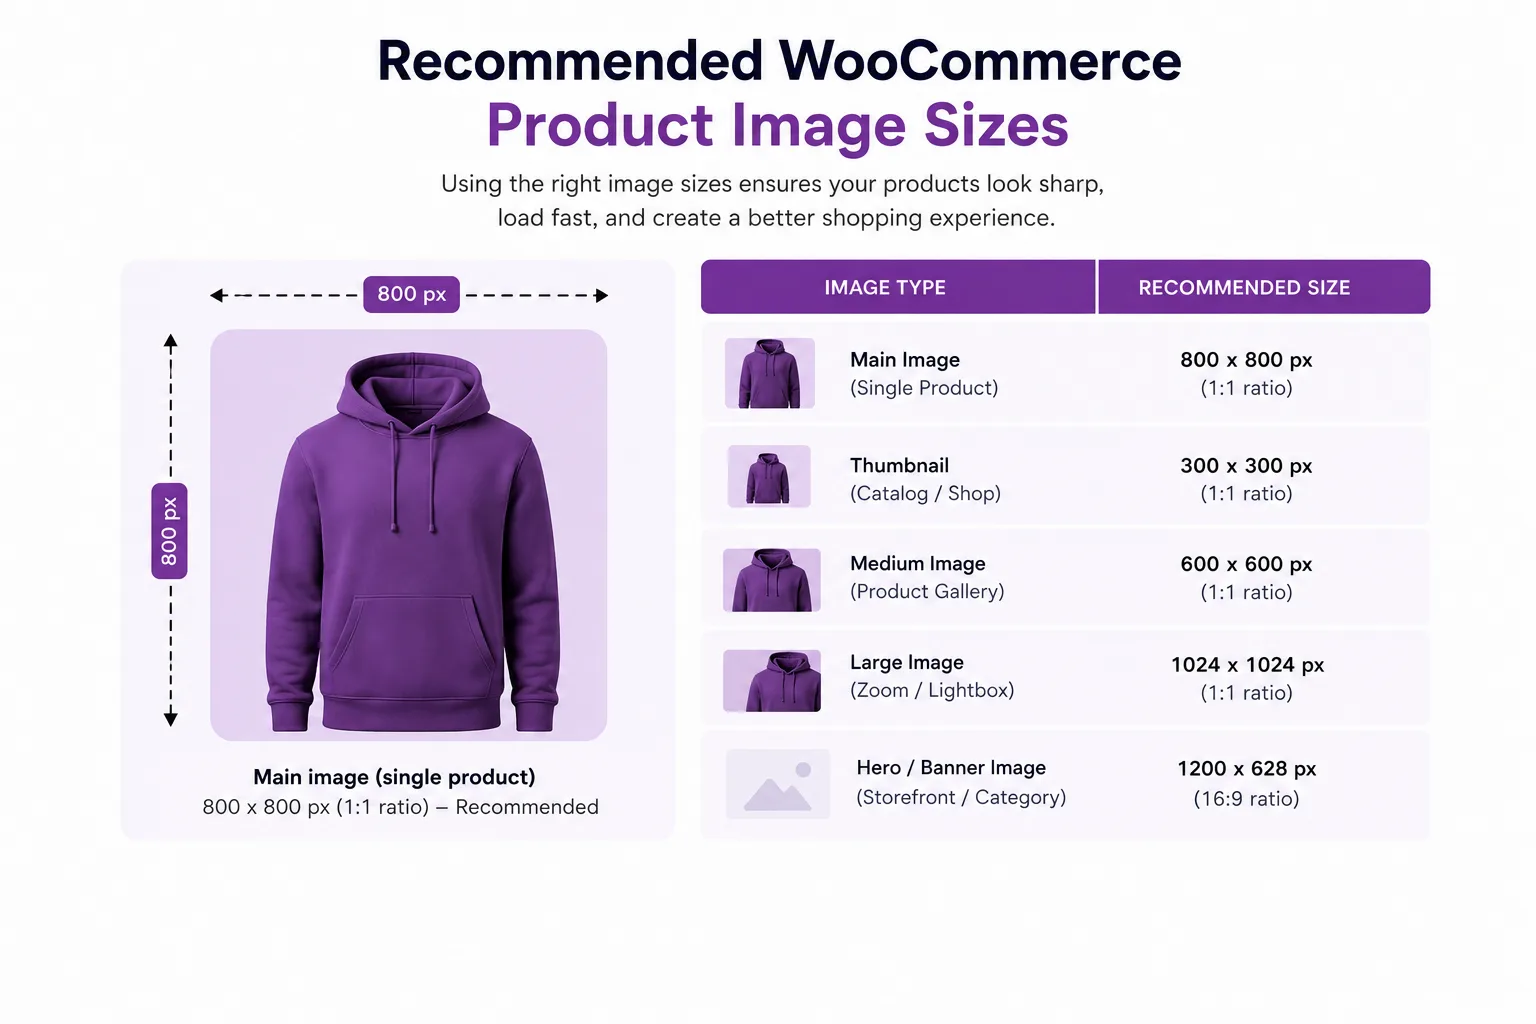
The Dimensions Most Stores Should Use
There’s no single correct WooCommerce product image size that works for every store. But there are solid starting points based on how WooCommerce displays images.
For single product images, upload at a minimum of 1200×1200px. WooCommerce displays these at 600px by default, but having a larger source file powers the zoom feature on the product page. If your source image is the same width as the display size, the zoom feature won’t work. You need headroom.
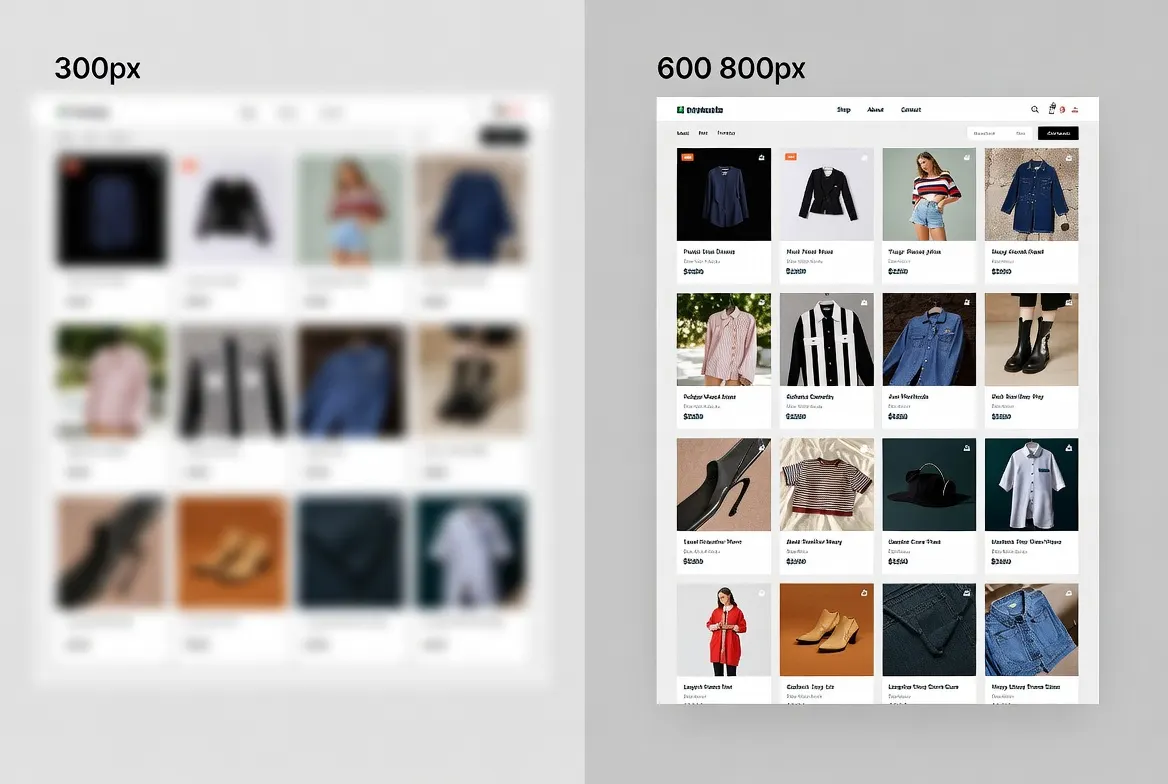
For catalog thumbnails (the shop page grid), WooCommerce defaults to 300px, but that looks soft on modern high-resolution displays. Most store owners raise this to 600–800px for a sharper grid.
For gallery thumbnails, leave them at 100×100px. These are navigation-only. Customers tap them to switch the main image, not to inspect detail.
For a broader look at sizing across eCommerce platforms, this guide on best image sizes for ecommerce websites covers recommended dimensions for WooCommerce, Shopify, and Amazon in one place.
How Your Theme Affects the Ideal Size
Your theme’s CSS controls the actual display dimensions on screen. What WooCommerce generates and what your theme renders can be two different numbers. Astra, Flatsome, and Storefront all render product grids at different widths.
The most reliable way to find your theme’s actual rendered size: open your shop page in a browser, right-click a product image, and select Inspect. Your browser dev tools will show the rendered width and height. Per WooCommerce’s official image guide, set your Main image width to match or exceed that rendered size. For retina or HiDPI screens, double it.
How to Change WooCommerce Product Image Sizes
1. Using the WordPress Customizer
You don’t need a plugin for this. WooCommerce builds the controls directly into the WordPress Customizer.
Per the official WooCommerce image sizing documentation, here are the steps:
- Go to Appearance → Customize
- Click WooCommerce → Product Images
- Set Main image width – this controls the single product page image
- Set Thumbnail width – this controls the shop and category page grids
- Choose your Thumbnail cropping setting
- Click Publish
One thing to know – you only set the width. Height is calculated automatically from the uploaded image’s aspect ratio. WooCommerce removed the height control intentionally to prevent distorted images.
Understanding the Three Thumbnail Cropping Options
The cropping option controls the shape of thumbnails on your shop and category pages. WooCommerce documents three choices:
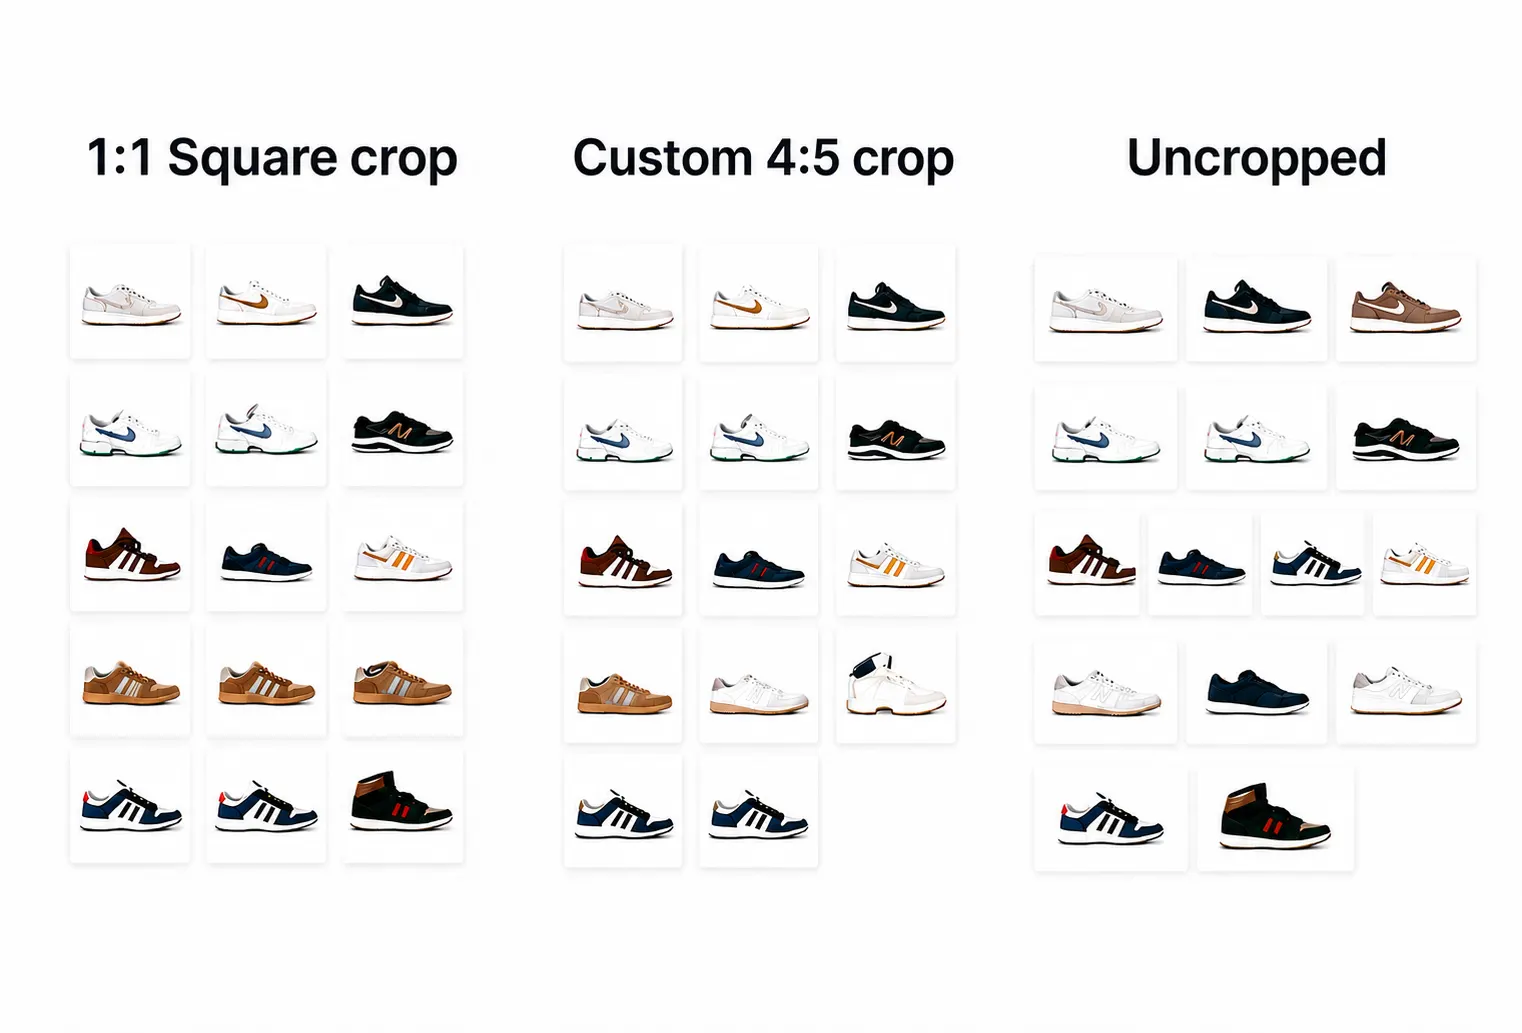
- 1:1 (Square) – thumbnails are square-cropped. The most common choice is because it keeps the product grid uniform, regardless of what aspect ratio your photos were shot in.
- Custom – you set a specific ratio (for example, 4:5 for portrait fashion photography, or 16:9 for wide product layouts).
- Uncropped – images display at their original uploaded aspect ratio. Only use this if every single product image in your catalog was photographed at exactly the same ratio. Otherwise, your shop grid will look uneven.
Note: The main featured image on the single product page is always uncropped. WooCommerce removed crop controls for that slot several versions ago.
What to Do If Your Theme Locks Image Sizes
Some themes use add_theme_support() to declare fixed image widths in code. When this happens, WooCommerce’s developer documentation states that the store owner can no longer change the declared widths – only the cropping setting remains visible in the Customizer. Check your theme’s documentation to find what sizes it sets, then make sure your source images are at least as large as those dimensions.
Regenerating Thumbnails After a Size Change
Why Existing Images Don’t Update on Their Own
This is the most common source of confusion after a size change. When you update your settings and hit Publish, WooCommerce applies those new dimensions only to images uploaded from that point forward. Photos already in your media library keep their old sizes and crops.
Per WooCommerce’s official blurry image documentation, “Any time you activate a new theme or change image dimension settings, you need to regenerate previously created thumbnails.” Skipping this step is why store owners end up with a shop grid that’s half new thumbnails and half old ones – inconsistent sizes, inconsistent cropping.
Two Ways to Regenerate Thumbnails
Option 1: WooCommerce built-in tool:
WooCommerce introduced background thumbnail regeneration in version 3.3. Per the WooCommerce thumbnail regeneration documentation: “When you make changes to image sizes/aspect ratios in the customiser, WC will detect these changes and queue a background regeneration job.”
If you need to trigger it manually, go to WooCommerce → Status → Tools and click Regenerate next to “Regenerate shop thumbnails.”
To check progress, go to WooCommerce → Status → Logs and filter for entries beginning with wc-image-regeneration.
Option 2: Regenerate Thumbnails using a free plugin:
The free Regenerate Thumbnails plugin by Codexpert, Inc., handles all WordPress-registered image sizes, not just WooCommerce ones. This matters when multiple plugins have registered their own size slots that are also out of sync. After you install the plugin, go to Thumbnails → Regenerate Thumbnails and run it across all images.
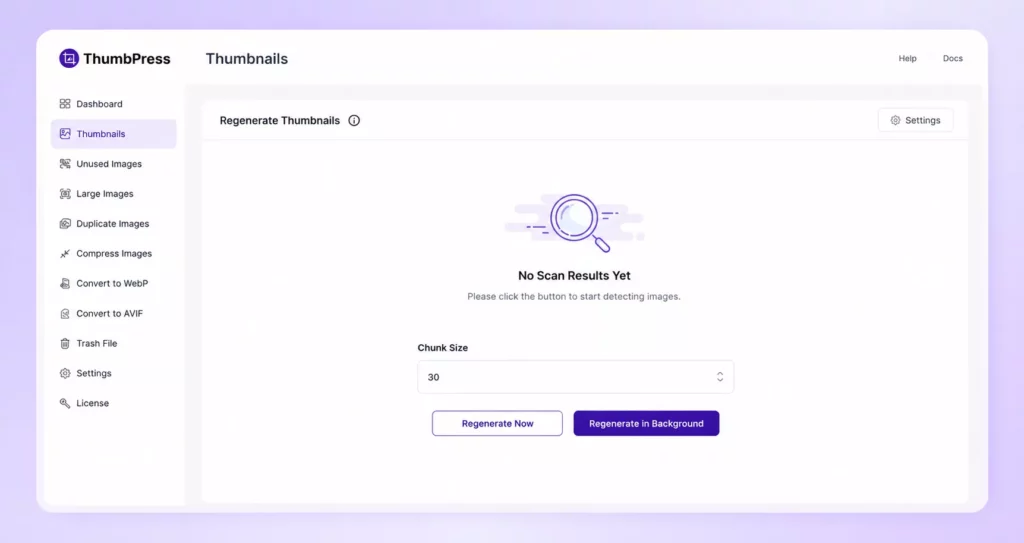
In a small store, regeneration finishes in a few minutes. In a store with thousands of products, you can use the option to run in the background; you don’t need to keep the page open.
WooCommerce Product Image Optimization
Why Pixel Dimensions Are Only Half the Job
Getting the right dimensions is the foundation. But a correctly sized JPEG at 3MB still drags your shop page down.
According to Google’s mobile page speed research, 53% of mobile users abandon a site that takes more than 3 seconds to load. For a WooCommerce store running paid ads, that means budget wasted before a single product is seen.
Product images are almost always the largest contributor to page weight on a WooCommerce shop page. If you want to understand the full financial picture behind this, the breakdown of the hidden revenue cost of unoptimized images connects the dots between image performance and lost revenue directly.
File Size Targets to Aim For
- Single product images: under 200KB
- Catalog thumbnails: under 50KB
- A 1200×1200px image converted to WebP typically hits both targets with no visible quality loss for most product types
WebP Is the Right Format in 2026
WebP lossless images are 26% smaller than equivalent PNGs. Lossy WebP images are 25–34% smaller than comparable JPEGs at equivalent visual quality. For a WooCommerce catalog with hundreds of product images, switching to WebP is one of the largest single reductions in page weight you can make.
ThumbPress converts existing product images to WebP and handles new uploads automatically, without sending your images to a third-party server. It also detects oversized images sitting in your media library, so you can address the bloated DSLR photos that slipped through before optimization was set up. The step-by-step process for how to compress images in WordPress covers the full workflow if you want to understand the approach first.
3 Common WooCommerce Image Problems (and How to Fix Them)
1. Blurry Product Images
Blurry product images are “usually caused by theme styling that specifies image dimensions incompatible with your uploaded images.” Your theme is trying to display images at a larger size than what WooCommerce generated.
The fix:
- Inspect your shop page with browser dev tools. Note the rendered image dimensions.
- Go to Appearance → Customize → WooCommerce → Product Images and set Main image width to match or exceed that number.
- Regenerate thumbnails.
- For retina screens, double the rendered size.
For a broader look at image display problems in WordPress, the guide to fixing common image issues in WordPress covers blurry images alongside duplicate images, broken gallery thumbnails, and other recurring problems.
2. Inconsistent Shop Grid Thumbnails
Two causes.
First: product images were uploaded at different aspect ratios, and cropping is set to Uncropped, so each thumbnail is a different shape.
Second: you changed image size settings but didn’t regenerate thumbnails, so old and new images have different crops sitting side by side.
Fix the first by switching Thumbnail cropping to 1:1 and regenerating.
Fix the second by regenerating after every settings change. If your source images vary dramatically in shape, normalize them before uploading.
3. Product Images Slowing Down the Shop Page
A shop page showing 24 products, each with an uncompressed JPEG at 500KB, is loading 12MB of images before any other page assets. WooCommerce’s own performance optimization documentation lists image optimization as a primary recommendation for improving store speed and increasing conversion rates.
The combination of compression, WebP conversion, and removing unused thumbnail sizes makes the biggest difference. ThumbPress’s thumbnail manager lets you disable size slots your theme never actually displays. Every registered size you stop generating is disk space and page weight removed on every future upload. You can also use ThumbPress to delete unused WooCommerce images that have built up in your media library over time.
Conclusion
WooCommerce product image size is one of those things that’s easy to get wrong once and then spend time wondering why the shop looks off.
The short version, upload source images at 1200×1200px minimum. Set your Customizer thumbnail widths to match your theme’s actual rendered dimensions, not the WooCommerce defaults. Regenerate thumbnails every time you change settings. And compress everything before it reaches your media library.
Get the dimensions right, then compress and convert to WebP. Those two steps together keep a growing product catalog from becoming a performance problem as your store scales.
ThumbPress handles WebP conversion, bulk compression, thumbnail management, and unused image cleanup in one plugin. No stacking separate tools, no jumping between dashboards. Download the free version on WordPress.org and start with WebP conversion and thumbnail control – the impact shows up on your first PageSpeed run.
Frequently Asked Questions
What image size should I upload for WooCommerce products?
Upload at 1200×1200px minimum for most products. WooCommerce generates its three registered thumbnail sizes from the source file you upload, so starting larger means all three come out sharp. It also gives the zoom feature on the single product page something to work with. Compress the file to under 200KB before uploading, and convert to WebP if your setup supports it.
Why do my WooCommerce images look blurry after changing the size settings?
You need to regenerate thumbnails. Changing size settings in the Customizer only applies to images uploaded after you save. Previously uploaded images keep their old crops until you regenerate. Use ThumbPress to regenerate thumbnails for your WooCommerce store.
Does WooCommerce product image size affect SEO?
Yes, in two direct ways. Oversized image files slow page load, which increases LCP (Largest Contentful Paint). Per Google Search Central, Core Web Vitals including LCP are used as signals in Google Search ranking. Faster, properly sized product images reduce LCP, which can improve your store’s position in search results. Blurry or broken product images also hurt engagement metrics, which are indirect ranking signals over time.
Subscribe to Our Newsletter
Get the latest WordPress tutorials, trends, and resources right in your inbox. No Spamming, Unsubscribe Anytime.

Thank you for subscribing to our newsletter!


Table of Content
- How WooCommerce Handles Product Images
- Three WooCommerce Image Size Slots
- Why WooCommerce Creates Multiple Image Versions?
- Recommended WooCommerce Product Image Sizes
- The Dimensions Most Stores Should Use
- How Your Theme Affects the Ideal Size
- How to Change WooCommerce Product Image Sizes
- 1. Using the WordPress Customizer
- Understanding the Three Thumbnail Cropping Options
- What to Do If Your Theme Locks Image Sizes
- Regenerating Thumbnails After a Size Change
- Why Existing Images Don't Update on Their Own
- Two Ways to Regenerate Thumbnails
- WooCommerce Product Image Optimization
- Why Pixel Dimensions Are Only Half the Job
- File Size Targets to Aim For
- WebP Is the Right Format in 2026
- 3 Common WooCommerce Image Problems (and How to Fix Them)
- 1. Blurry Product Images
- 2. Inconsistent Shop Grid Thumbnails
- 3. Product Images Slowing Down the Shop Page
- Conclusion
- Frequently Asked Questions
- What image size should I upload for WooCommerce products?
- Why do my WooCommerce images look blurry after changing the size settings?
- Does WooCommerce product image size affect SEO?