
Image CDN


ThumbPress Image CDN serves your website images through a global edge network with 95+ points of presence (POPs). Images are delivered from a location closer to each visitor, which can reduce loading time and provide a smoother browsing experience.
You do not need to create CDN credentials or configure a separate service. ThumbPress handles the connection for you.
What do 95+ points of presence mean?
A point of presence, or POP, is a physical network location containing CDN servers. ThumbPress CDN has access to more than 95 of these locations across different regions.
Without a CDN, every visitor typically requests an image from the server hosting your WordPress website. The farther the visitor is from that server, the longer the image data may take to reach them.
With ThumbPress CDN enabled, copies of your images can be cached at edge locations. When someone visits your website, the CDN serves the image from a nearby available POP instead of sending every image request back to your hosting server.
For example, if your website is hosted in the United States and someone visits it from Asia, the images can be delivered from a CDN location closer to them. They do not need to travel from the United States for every request.
Using a network of 95+ POPs can help provide:
- Faster image delivery for visitors in different countries
- Less distance for image data to travel
- Reduced image-request load on your website’s hosting server
- More consistent loading times for a global audience
The 95+ POPs do not create extra images inside your WordPress Media Library. The CDN manages its cached copies separately while your original images remain on your website.
Accessing ThumbPress CDN
From your WordPress dashboard, navigate to: WordPress Dashboard → ThumbPress → CDN
The CDN page shows the region selected for your website, the storage included with your plan, and your CDN URL.
Note: ThumbPress Image CDN is a Pro feature. To use this feature, you have to get ThumbPress Pro.
Enable ThumbPress CDN
When you have both ThumbPress and ThumbPress Pro, next you have to connect your website to the CDN. To connect your website to the CDN:
- Open ThumbPress → CDN.
- Review the region, included storage, and CDN URL.
- Click Enable ThumbPress CDN.
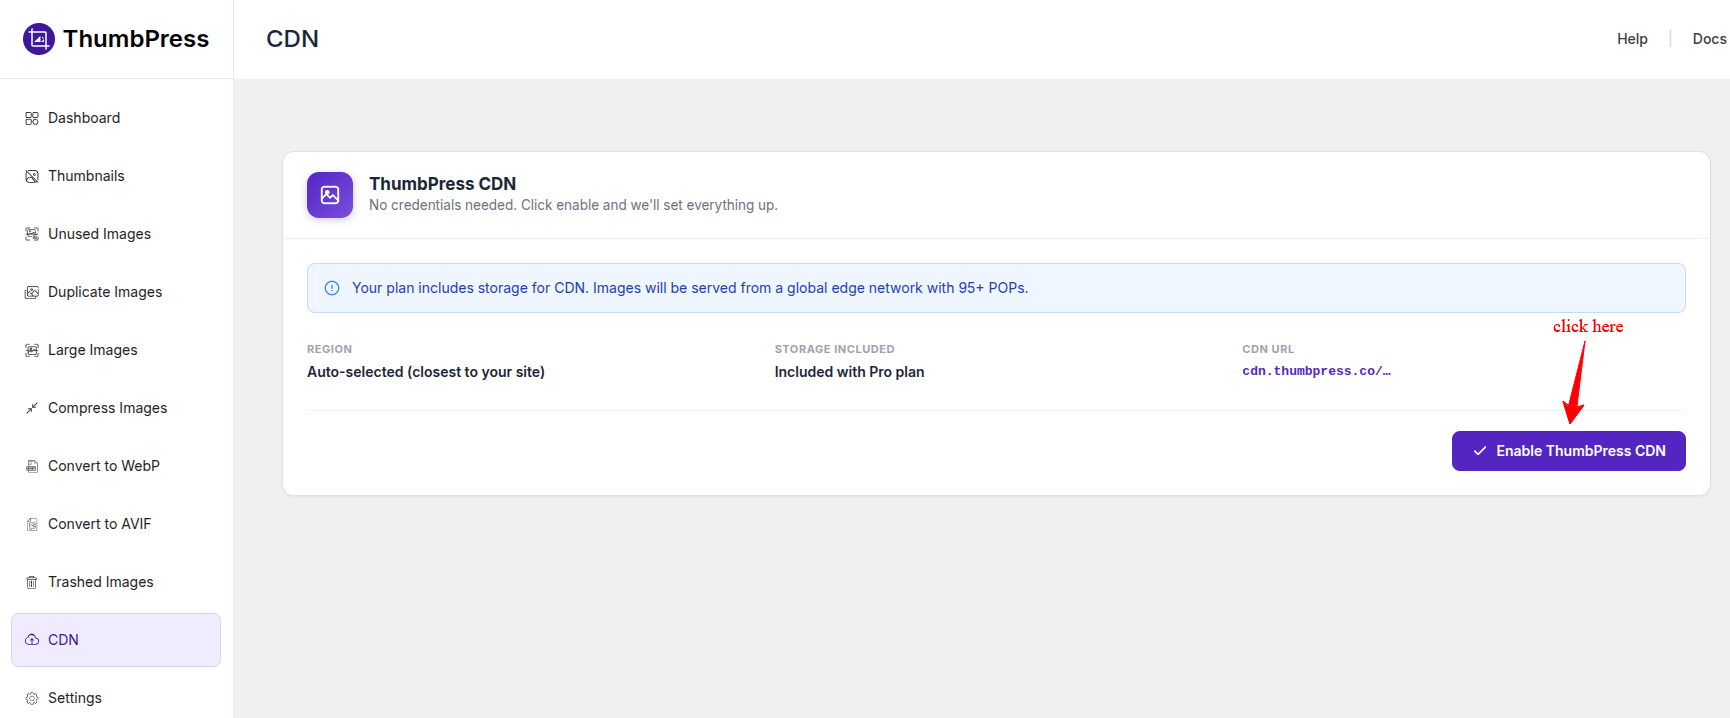
ThumbPress automatically sets up the CDN connection. No credentials are required.
Once activated, the status changes to ThumbPress CDN · Active, and the page confirms that the CDN is serving your images.
Understanding the CDN Dashboard
The active CDN dashboard gives you a quick overview of the connection and storage usage.
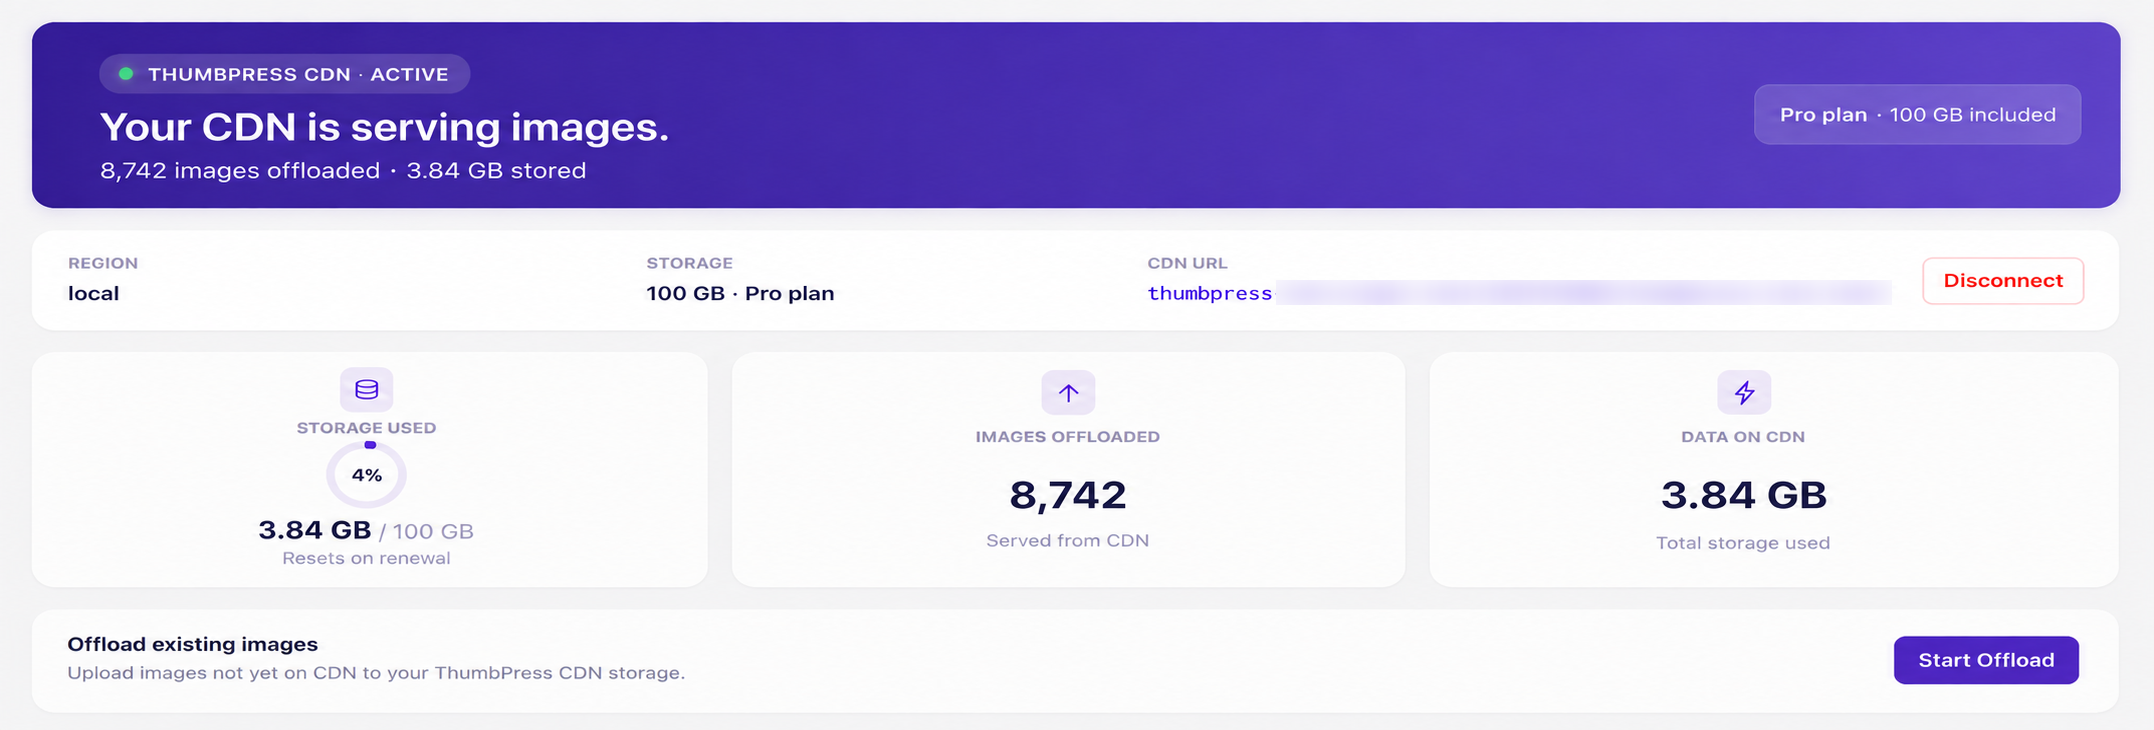
- Region: The location selected for your CDN storage.
- Storage: The total CDN storage included with your ThumbPress plan.
- CDN URL: The CDN address used to serve your website images.
- Storage Used: How much of the included storage you have used. The allowance resets when your plan renews.
- Images Offloaded: The number of images uploaded to and served from the CDN.
- Data on CDN: The total amount of storage currently used by your files on the CDN.
Offload Existing Images
Enabling the CDN connects it to your website. To upload images already in your WordPress Media Library to ThumbPress CDN:
- Find the Offload existing images section.
- Click Start Offload.
- Allow ThumbPress to upload the images that are not yet stored on the CDN.
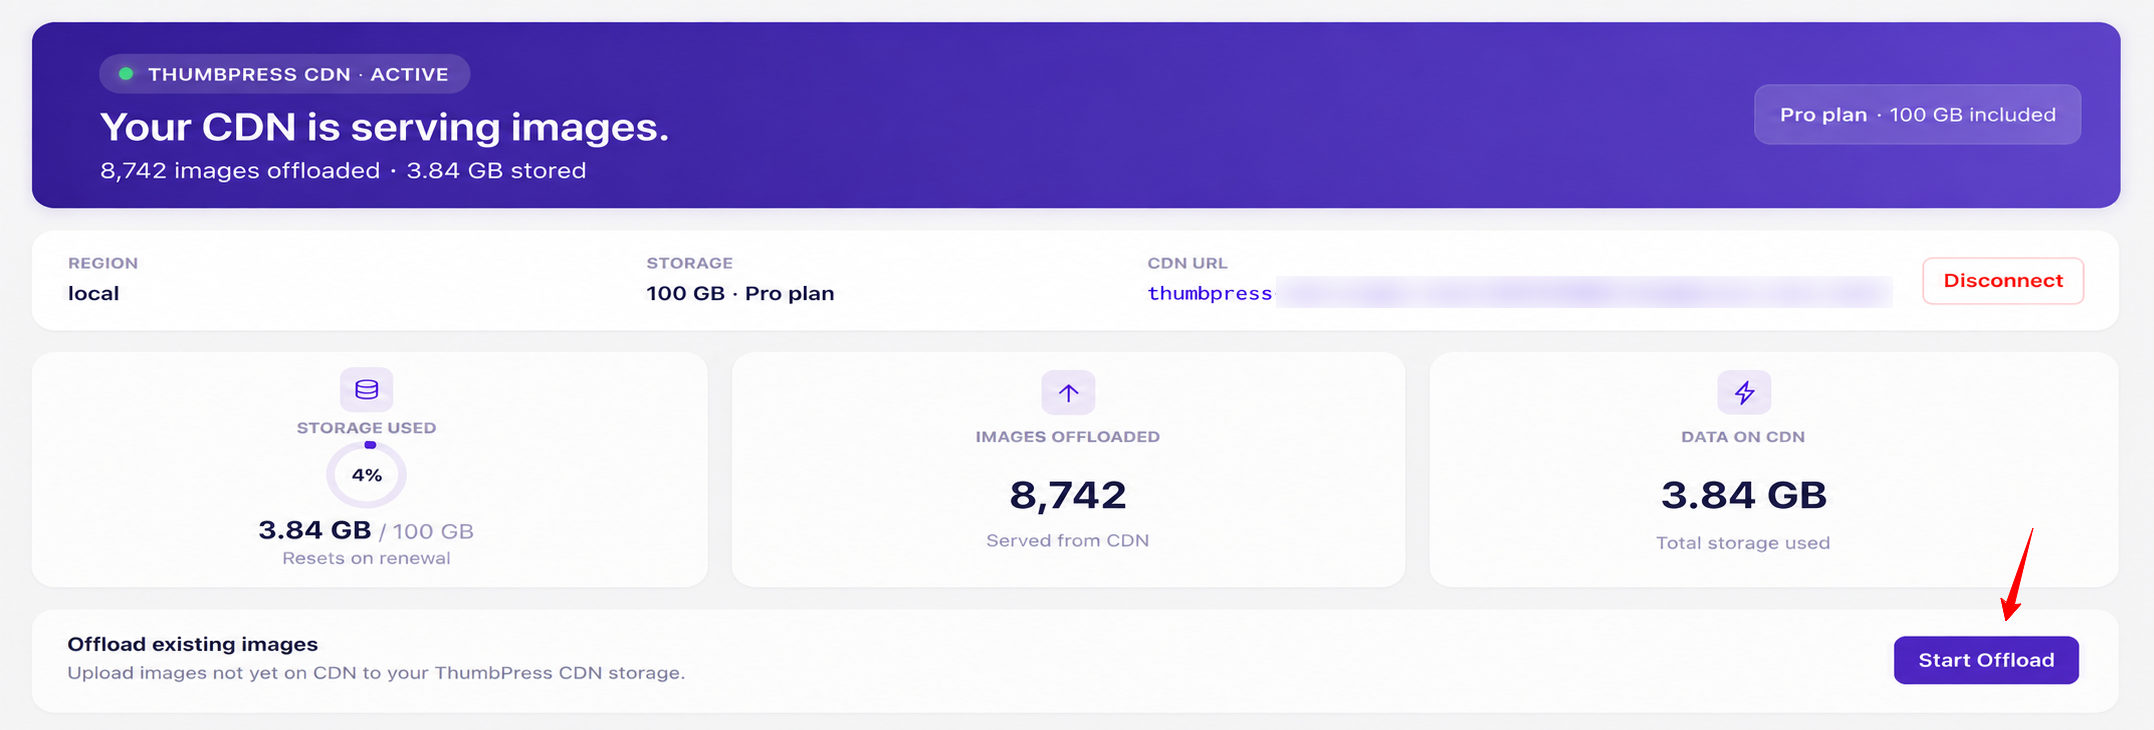
After offloading, the dashboard updates the number of images offloaded and the amount of CDN storage used.
Disconnect ThumbPress CDN
You can disconnect the CDN whenever needed. When disconnected, your image URLs return to the local files on your website.
To disconnect:
- Open ThumbPress → CDN.
- Click Disconnect.
- Choose what should happen to files already stored on the CDN:
- Keep files on the CDN: The CDN copies remain stored. If you reconnect later, ThumbPress can reuse them without uploading the files again.
- Delete files from the CDN: The CDN copies are permanently removed to free your CDN storage. This option removes the copies stored on the CDN, not the original images on your website.
- Click Disconnect to confirm, or Cancel to keep the CDN active.
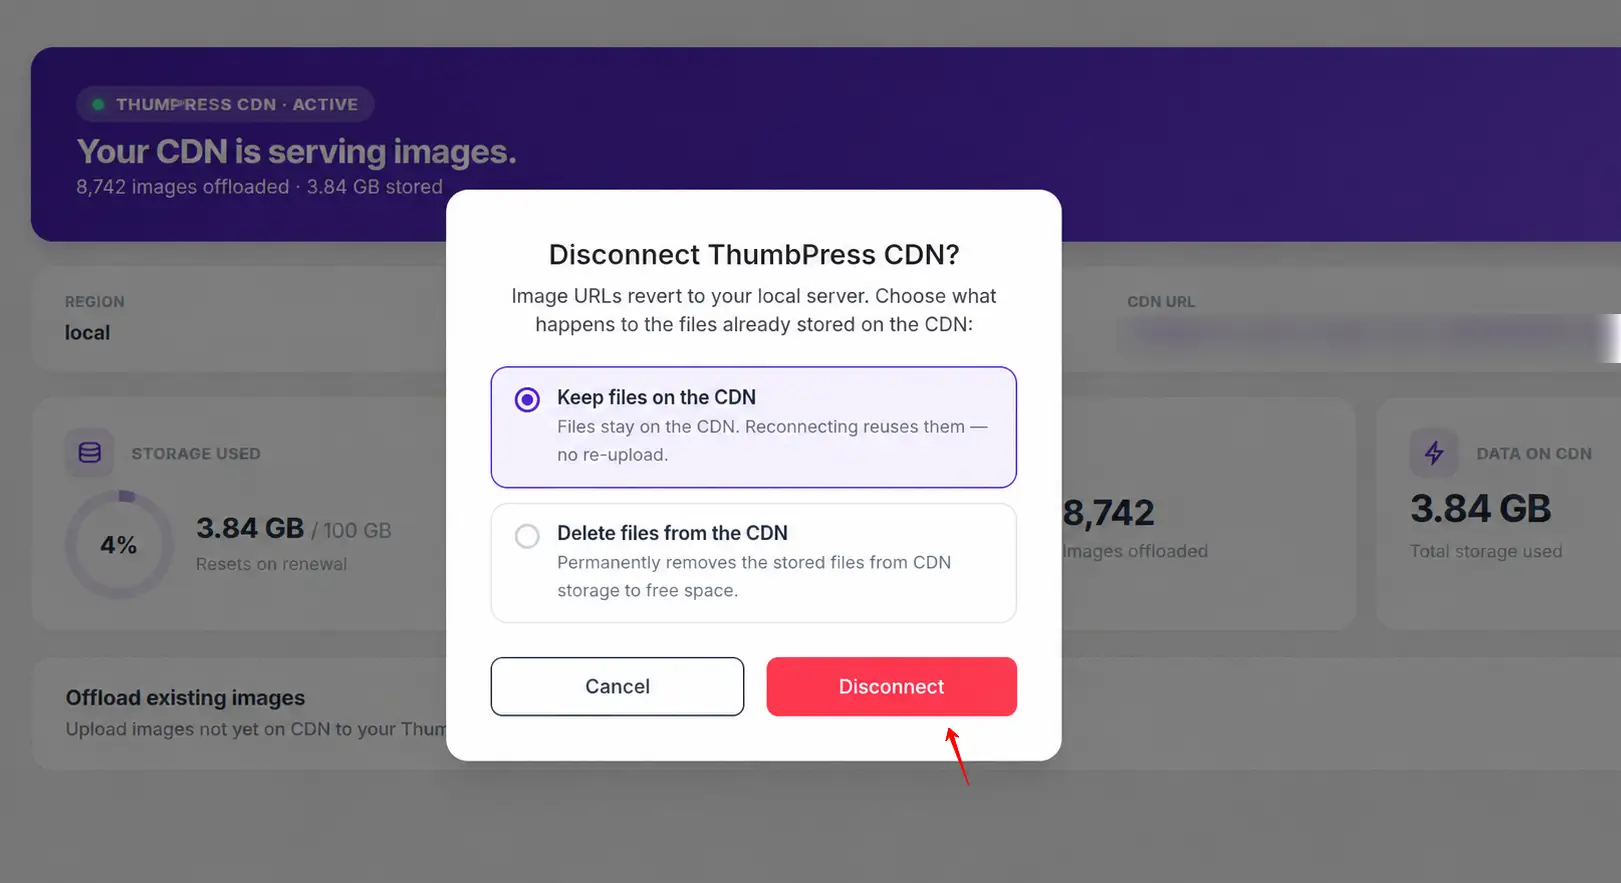
Note: Choose Keep files on the CDN if you expect to reconnect. Choose Delete files from the CDN only when you no longer need the stored CDN copies.
Was this doc helpful?
Subscribe to Our Newsletter
Get the latest WordPress tutorials, trends, and resources right in your inbox. No Spamming, Unsubscribe Anytime.

Thank you for subscribing to our newsletter!